X52 Pro DX Profile for BMS 4.32
-
(Download updated …. see post #23).
Download: http://firstfighterwing.com/VFW/downloads.php?do=file&id=91 (For better or worse, you’ll have to register at 1st VFW to access the Public Downloads.)
Zip contains:
- PDF of X52 Pro Function Layout
- Read Me
- Saitek .pr0 profile
- BMS .key keyfile
- Kolbe/BMS Keyfile Generator w/X52 Pro added
To use as a ‘drop in’:
Place Flounder x52 Pro v3.pr0 in C:\Users\Public\Documents\SmartTechnology Profiles …. load to your stick via Saitek Control System
Place Flounder X52 Pro v3.key in C:\Falcon BMS 4.32\User\Config … load via Setup–>Controllers–>Load
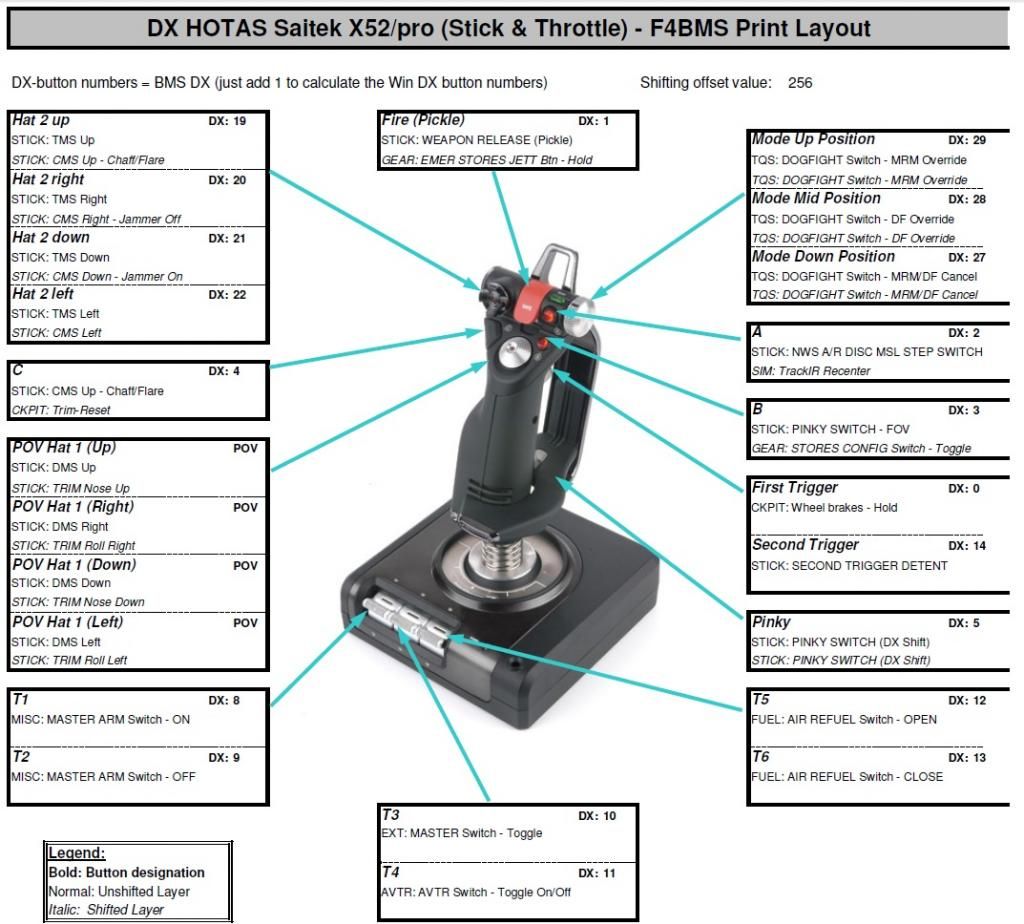
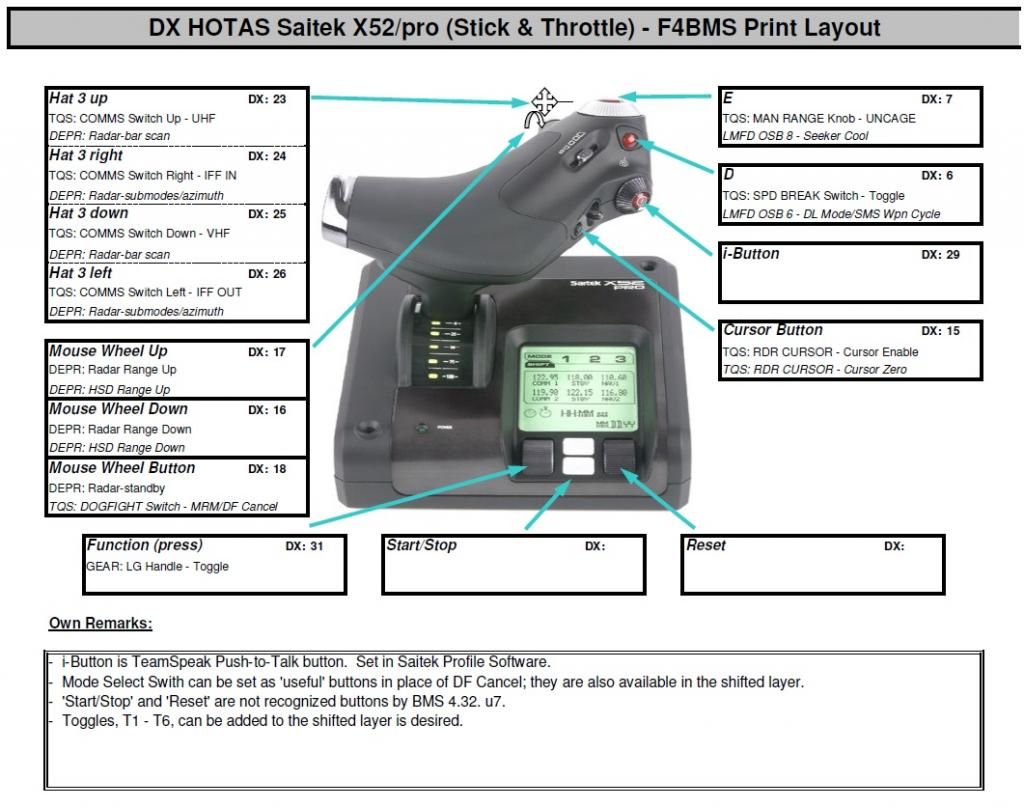
Included PDF shows the DX button layout with associated BMS Call Backs.
Only 2 items are not DX functions:
1.) Cursor slewing.
2.) TeamSpeak Push-to-Talk. Mine is ‘Caps Lock’, yours may be different.These are maintained in the Saitek/MadCatz profiler software (SST?).
Slider is set to FOV Control in BMS SETUP–>CONTROLLERS–>ADVANCED–> VIEW CONTROL
Range Knob and Radar Elevation are set in BMS SETUP–>CONTROLLERS–>ADVANCED–> AVIONICS CONTROLDX assigments/call backs assume the X52 Pro is the first Game Controller in the Windows Game Controller applet. If not, you’ll need to adjust Kolbe’s spreadsheet and re-copy the output page. That is pasted (overwrites the DX button assignments) at the bottom of your current *.key file. This spreadsheet is also where you would make changes or adds to customize this profile/keyfile.
If the layout suits you, just copy the ‘Flounder X52 Pro v3’ file and paste in your BMS USER --> CONFIG folder, then load that file in the sim SETUP --> CONTROLLERS screen. THIS KEY FILE HAS BEEN SLIGHTLY MODIFIED FROM THE STOCK BMS.KEY FILE. Insert, Home, Pg Up, Pg Dn, End and Delete as well as the Arrow keys have been modified.
The no-modifier ‘Insert/Home Key Cluster’ are now:
SimICPDEDUP 1113 0 0XC7 0 0 0 1 “ICP-DCS-Up”
SimICPDEDDOWN 1114 0 0XCF 0 0 0 1 “ICP-DCS-Down”
SimICPDEDSEQ 1115 0 0XD1 0 0 0 1 “ICP-DCS-Seq”
SimICPResetDED 1112 0 0XD3 0 0 0 1 “ICP-DCS-Return”
SimICPNext 1024 0 0XC9 0 0 0 1 “ICP-Next”
SimICPPrevious 1023 0 0XD2 0 0 0 1 “ICP-Previous”The no-modifier ‘Arrow Key Cluster’ are now:
OTWViewUp -1 0 0XC8 0 0 0 1 “View-rotate up”
OTWViewDown -1 0 0XD0 0 0 0 1 “View-rotate down”
OTWViewLeft -1 0 0XCB 0 0 0 1 “View-rotate left”
OTWViewRight -1 0 0XCD 0 0 0 1 “View-rotate right”The no-modifier ‘/’, ‘*’, ‘-’ and ‘+’ on the Number Pad are now:
SimICPNav 1012 0 0XB5 0 0 0 1 “ICP-NAV”
SimICPAA 1013 0 0X37 0 0 0 1 “ICP-A-A”
SimICPAG 1014 0 0X4A 0 0 0 1 “ICP-A-G”
SimDriftCO 1116 0 0X4E 0 0 0 1 “ICP-Drift C/O Toggle”DX Assignments:
#==================================================================================
SimDoNothing -1 0 0XFFFFFFFF 0 0 0 -2 "                                     DX HOTAS SECTION"
SimDoNothing -1 0 0XFFFFFFFF 0 0 0 -2 "========= HOTAS UNSHIFTED ========="
SimWheelBrakes 0 -1 -2 0 0x0 0
SimPickle 1 -1 -2 0 0x0 0
SimMissileStep 2 -1 -2 0 0x0 0
SimPinkySwitch 3 8 -2 0 0x0 0
SimCMSUp 4 -1 -2 0 0x0 0
SimHotasPinkyShift 5 -1 -2 0 0x0 0
AFBrakesToggle 6 -1 -2 0 0x0 0
SimToggleMissileCage 7 -1 -2 0 0x0 0
SimArmMasterArm 8 -1 -2 0 0x0 0
SimSafeMasterArm 9 -1 -2 0 0x0 0
SimExtlPower 10 -1 -2 0 0x0 0
SimAVTRToggle 11 -1 -2 0 0x0 0
SimFuelDoorOpen 12 -1 -2 0 0x0 0
SimFuelDoorClose 13 -1 -2 0 0x0 0
SimTriggerSecondDetent 14 -1 -2 0 0x0 0
SimCursorEnable 15 -1 -2 0 0x0 0
SimRadarRangeStepDown 16 -1 -2 0 0x0 0
SimRadarRangeStepUp 17 -1 -2 0 0x0 0
SimRadarStandby 18 -1 -2 0 0x0 0
SimTMSUp 19 -1 -2 0 0x0 0
SimTMSRight 20 -1 -2 0 0x0 0
SimTMSDown 21 -1 -2 0 0x0 0
SimTMSLeft 22 -1 -2 0 0x0 0
SimTransmitCom1 23 -1 -2 0 0x0 0
SimCommsSwitchRight 24 -1 -2 0 0x0 0
SimTransmitCom2 25 -1 -2 0 0x0 0
SimCommsSwitchLeft 26 -1 -2 0 0x0 0
SimDeselectOverride 27 -1 -2 0 0x0 0
SimSelectSRMOverride 28 -1 -2 0 0x0 0
SimSelectMRMOverride 29 -1 -2 0 0x0 0
AFGearToggle 31 -1 -2 0 0x0 0
SimDMSUp 0 -1 -3 0 0x0 0
SimDoNothing 0 -1 -3 1 0x0 0
SimDMSRight 0 -1 -3 2 0x0 0
SimDoNothing 0 -1 -3 3 0x0 0
SimDMSDown 0 -1 -3 4 0x0 0
SimDoNothing 0 -1 -3 5 0x0 0
SimDMSLeft 0 -1 -3 6 0x0 0
SimDoNothing 0 -1 -3 7 0x0 0
#==================================================================================
SimDoNothing -1 0 0XFFFFFFFF 0 0 0 -2 "========= HOTAS SHIFTED ========="
SimDoNothing 256 -1 -2 0 0x0 0
SimEmergencyJettison 257 -1 -2 0 0x0 0
RecenterTrackIR 258 -1 -2 0 0x0 0
SimCATSwitch 259 -1 -2 0 0x0 0
AFResetTrim 260 -1 -2 0 0x0 0
SimHotasPinkyShift 261 -1 -2 0 0x0 0
SimCBEOSB_6L 262 -1 -2 0 0x0 0
SimCBEOSB_8L 263 -1 -2 0 0x0 0
SimDoNothing 264 -1 -2 0 0x0 0
SimDoNothing 265 -1 -2 0 0x0 0
SimDoNothing 266 -1 -2 0 0x0 0
SimDoNothing 267 -1 -2 0 0x0 0
SimDoNothing 268 -1 -2 0 0x0 0
SimDoNothing 269 -1 -2 0 0x0 0
SimDoNothing 270 -1 -2 0 0x0 0
SimRadarCursorZero 271 -1 -2 0 0x0 0
SimHSDRangeStepDown 272 -1 -2 0 0x0 0
SimHSDRangeStepUp 273 -1 -2 0 0x0 0
SimDeselectOverride 274 -1 -2 0 0x0 0
SimCMSUp 275 -1 -2 0 0x0 0
SimCMSRight 276 -1 -2 0 0x0 0
SimCMSDown 277 -1 -2 0 0x0 0
SimCMSLeft 278 -1 -2 0 0x0 0
SimRadarBarScanChange 279 -1 -2 0 0x0 0
SimRadarAzimuthScanChange 280 -1 -2 0 0x0 0
SimRadarBarScanChange 281 -1 -2 0 0x0 0
SimRadarAzimuthScanChange 282 -1 -2 0 0x0 0
SimDeselectOverride 283 -1 -2 0 0x0 0
SimSelectSRMOverride 284 -1 -2 0 0x0 0
SimSelectMRMOverride 285 -1 -2 0 0x0 0
SimDoNothing 287 -1 -2 0 0x0 0
AFElevatorTrimUp 2 -1 -3 0 0x0 0
SimDoNothing 2 -1 -3 1 0x0 0
AFAileronTrimRight 2 -1 -3 2 0x0 0
SimDoNothing 2 -1 -3 3 0x0 0
AFElevatorTrimDown 2 -1 -3 4 0x0 0
SimDoNothing 2 -1 -3 5 0x0 0
AFAileronTrimLeft 2 -1 -3 6 0x0 0
SimDoNothing 2 -1 -3 7 0x0 0
Add the .pr0 file to your Saitek profile folder and load that via the Saitek control system.
There are still numerous ‘spaces’ for additional commands (either in the shifted or un-shifted state). Some notes on a few of those open ‘spaces’:
- i-Button is TeamSpeak Push-to-Talk button. Set in Saitek Profile Software.
- Mode Select Swith is set for DF/MRM and Override Cancel in both the shifted and un-shifted state; using only one shift state opens 3 additional functions/commands.
- CMS Up (Drop Chaff/Flare) is duplicated in the unshifted layer for quick access.
- ‘Start/Stop’ and ‘Reset’ are not recognized buttons by BMS 4.32 u7.
- Toggles, T1 - T6, can be added to the shifted layer as desired for 6 additional functions/commands.
- DX31 (Function on Throttle MFD) has an open space in the shifted layer.
- BMS only recognizes a press of the Function wheel at the Throttle MFD (DX31). No other buttons/wheels on the MFD are recognized by BMS.
The purpose of this upload is a basis/foundation for a full DX profile for the X52 Pro. It may or may not suit your personal needs ‘as is’.
Thoughts on the ‘lost’ mode states on the X52 Pro:
As many may note, using DX functionality limits the number of programmable buttons on the X52 Pro by a significant factor compared to using the Saitek profile software and having 3 Modes each, potentially, with it’s associated shift state. I realize this limitation and accept it on the basis of:- I don’t need that many buttons;
- My opinion is that the addtional complication as far as ‘managing’ what mode and/or shift state I’m in is counter-productive (i.e. Risk > Reward);
- DX programming ‘cuts out the middle man’ reducing potential conflicts between Saitek software and BMS;
- Although not ‘Cougar Accurate’, DX programming is closer to realistic F-16 stick functionality;
Others will of course have other opinions and they may use or not use, modifiy or not modify, this profile to fit their own needs and their own view of the sim.
AS ALWAYS: MAKE BACKUP COPIES OF ANY FILES BEFORE THEY ARE CHANGED OR OVER-WRITTEN.
Thanks to Hard~Deck, KesMonkey, Kolbe (and others) for ideas on layout, DX tools, etc.
Download: http://firstfighterwing.com/VFW/downloads.php?do=file&id=91 (For better or worse, you’ll have to register at 1st VFW to access the Public Downloads.)
Zip contains:
- PDF of X52 Pro Function Layout
- Read Me
- Saitek .pr0 profile
- BMS .key keyfile
- Kolbe/BMS Keyfile Generator w/X52 Pro added
-
Great profile. Simple and functional - Thanks. One question however: I am trying to use the slider for FOV control as you are, but my slider has enough noise that the view “throbs” at anything other than the min or max position. Extremely headache inducing. Do you or anyone else have this problem? This is a brand new stick for me, so I’m not quite sure what to expect.
Yes. You can see it in the Saitek control panel …. the slider ‘shakes’.
Couple of things to try:
1. Set a small deadzone in the Saitek control panel
2. Set the FOV increments in the Falcon BMS Config file to 3 or 5 (something a little smaller than default)Even so, I sometimes have problems. I find that if I move the FOV just a little forward or back, I can find a stable spot. It’s problem with the stick (as demonstrated by the seeing it in the Saitek control panel), not an issue with the profile. I had the same thing on the X52 and the X52 Pro with other profiles.
-
Thanks for the suggestions. I tried changing the FOV increment value in the config file, but that had no effect. I’m guessing that only applies to keyboard control of FOV. Putting a dead zone in the middle 1/3 of the slider sort of works. It basically turns the slider into a three position switch (near, mid, far), but it keeps it from shaking in the center region where the problem was worst. I have only had this stick for a few days, but I can’t say I am impressed with slider or mouse cursor nub. Both are very noisy.
I am having one other problem with this profile. Well, I think it is a problem. When I depress the pinky switch the button stays asserted even after I release the switch. When I depress the switch again, the button stops asserting. All the shifted functions do work correctly when the pinky switch is in its asserted state. I am using your key and profile files without any modifications. Is this the intended behavior? I was expecting that using shifted functions would require the pinky switch to be held down, and when released it would go back to unshifted functions.
-
….
I am having one other problem with this profile. Well, I think it is a problem. When I depress the pinky switch the button stays asserted even after I release the switch. When I depress the switch again, the button stops asserting. All the shifted functions do work correctly when the pinky switch is in its asserted state. I am using your key and profile files without any modifications. Is this the intended behavior? I was expecting that using shifted functions would require the pinky switch to be held down, and when released it would go back to unshifted functions.It’s neither intended nor unintended. It’s just the way it happened, not the result of planning.
I had assumed the pinky switch would be momentary (had to be held), but when I applied the DX command and used it, it was an on-off-on switch. I just assumed that was how it was ‘supposed’ to be.
Maybe someone with a DX ‘pinky shift layer’ on another application would be able to say if it’s the same there.
Edit:
See this post to ‘fix’ the Pinky key: https://www.benchmarksims.org/forum/showthread.php?18522-X52-Pro-DX-Profile&p=311975&viewfull=1#post311975
Open the Saitek profile in the Saitek SST software. Find the Pinky button line. Choose the > to get the command menu. Deselect ‘Latched’. Save the profile.
Pinky key should work as expected …. short press = FOV/Zoom on SOI; Long Press (and hold) = Shifted Layer DX Commands; Release reverts to unshifted DX command layer.
-
Thanks for the clarification. Either way, it is still a great profile.
-
-
Very nice work. Have you modified Kolbe’s original excel file to include the X52-Pro (or is there an updated version of it)? I started modifying it myself to include the Pro (bitmaps, DX keys etc…)
By the way, the ‘I’ button is DX:30 not DX:29.
Cheers.
-
Very nice work. Have you modified Kolbe’s original excel file to include the X52-Pro (or is there an updated version of it)? I started modifying it myself to include the Pro (bitmaps, DX keys etc…)
……
Yes, in the zip file linked above, Kolbe’s sheet is modified for the X52 Pro …. pictures, DX button numbers, etc. I have had PM with Kolbe and he has updated/added numerous other controllers, including the X52 Pro. Those will be included in some future release of his spreadsheet.
…. By the way, the ‘I’ button is DX:30 not DX:29.
Cheers.
Got it. It was in the picture only. Profile/script was correct. I’ve fixed the picture, but won’t be able to get the zip file updated right away.
-
Ah Ok. I hadn’t downloaded that zip yet, was just looking at the key code section above. Will download it. Good work!
-
Thanks for this profile. I am finding the Saitek software very frustrating in this sim as well as FSX. Profiles just disappear.
-
Hello. I apologize for my English, I write through an interpreter. Joystick Saitek X52pro. Problem: does not work DX Shift key. How to install HotasPinkyShiftMagnitude? If possible detail. Thank U.
-
Hello. I apologize for my English, I write through an interpreter. Joystick Saitek X52pro. Problem: does not work DX Shift key. How to install HotasPinkyShiftMagnitude? If possible detail. Thank U.
In this profile the shift key works fine, but in an unintended way …. it is ‘on-off-on’ instead of momentary. I don’t not know why or how to make it momentary.
….
I am having one other problem with this profile. Well, I think it is a problem. When I depress the pinky switch the button stays asserted even after I release the switch. When I depress the switch again, the button stops asserting. All the shifted functions do work correctly when the pinky switch is in its asserted state. I am using your key and profile files without any modifications. Is this the intended behavior? I was expecting that using shifted functions would require the pinky switch to be held down, and when released it would go back to unshifted functions.It’s neither intended nor unintended. It’s just the way it happened, not the result of planning.
I had assumed the pinky switch would be momentary (had to be held), but when I applied the DX command and used it, it was an on-off-on switch. I just assumed that was how it was ‘supposed’ to be.
Maybe someone with a DX ‘pinky shift layer’ on another application would be able to say if it’s the same there.
-
i think its because in the sst the pinky switch is latched
i have used your profile as a template and have the pinky switch working as it should(quick press for expand or hold for shift)
the only changes to your profile i have made is MPOHOLD on button B and STEERPOINT NEXT & PREVIOUS on shifted T1&T2
A very good profile though thank you for sharing your work

-
i think its because in the sst the pinky switch is latched ….
I’ll have to look at that. Thanks.
And thanks for your kind words.
")
-
Have you found the problem yet
-
i think its because in the sst the pinky switch is latched
i have used your profile as a template and have the pinky switch working as it should(quick press for expand or hold for shift)
….I’ll have to look at that. Thanks.
And thanks for your kind words.
Have you found the problem yet
Sorry, I’ve been out of town.
The pinky switch was ‘latched’ in the SST software. I’ve un-latched it (deselected) and will give it a try tomorrow.
-
-
-
This post is deleted!


")