Newbie's Multiplayer Guide
-
Here’s a guide I wrote for my squadron, but I figure it might be helpful to some of the folks on here.
–-
New Pilot’s Guide

A question I sometimes get from new guys is: how do I play with you guys? And they don’t mean “how do I use the f-16 systems” - it’s more of a matter of what language to use, where to be, what to say, and what have you.
Here’s a little guide on what you should be doing as a new player.
You will find yourself in the position of a wingman. In a 4 plane (ship) flight you will be #2, or more likely #4. Let’s look at the composition of a flight:
Element 1
#1 The Flight Leader - the most senior pilot, he leads element 1 and the overall flight. His jobs include navigation, target acquisition/sorting, tactical planning and leadership.
#2 Wingman - the most senior pilot besides 1 and 3Element 2
#3 Element Leader - the second most senior pilot, he is 2nd in command of the flight and leads element 2. His jobs include keeping up situational awareness and supporting element 1.
#4 Wingman, the least senior pilotYour Job as a Wingman

The job of a wingman is to support the lead of an element and execute orders. The basic list of responsibilities is:
- Stay in formation at all times. Do not worry about the overall flight formation, stay in formation relative to your lead. The easiest way to do this in a finger four (looks like a wedge from ARMA - default formation) is to keep the lead at your 1 o’clock (if you’re #2) or your 11 o’lock position (if you’re #4) and within close visual range.
- Being in formation is all that matters, your job is not to use the sensors or navigate and IT IS NOT TO USE AWACS. Once you get good you can use your radar or other sensors to keep situational awareness, but until then, just focus on being in formation.
- Keep chatter to a minimum and let the leads sort targets
- Attack targets the leads assign to you, and attack targets on your own discretion only if they directly threaten you or other members of the flight and you have a confirmation that they are hostile by visual means
- Support the lead tactically - this is a very diverse topic, but it ultimately means that if he is attacking, you should be making sure he doesn’t get killed.
Some tips for staying in formation:
- Use the TWS radar to lock up your lead. Only press TMS up once, otherwise he will hear a lock noise. This is referred to as a “buddy spike” and if your lead calls that, make sure you are im TWS.
- Now you will have on your FCR a closure rate to the target, as well as the lead’s heading and attitude. You can use this, in conjunction with the bearing line on the HUD, to stay in formation and not overshoot him. Eventually…
- You will be able to know if you are going the right speed because when you’re flying with your lead on the beam, he will appear motionless. The more he moves away from you, that means you need to speed up. The more he moves back, it means you’re going too fast.
- If you know you are going to overshoot the lead, try to gain altitude or “unload” away from the lead rather than kill your throttle if possible. If you are going to kill your throttle, don’t go overboard, because it’s difficult to build up speed and very easy to lose it.
- Turn on the HMCS to visually acquire the lead. If you lock him up, as above, you will now have off boresight spotting capability which will very quickly vector you to his position.
- It’s better to lag behind the lead than it is to overshoot him. For new guys I would reccomend not trying to fly extremely close, and when doing a take off roll delay your burn by a few seconds to let the lead get a clear lead in front of you, this way you can acquire him when he takes off.
- Another way of acquiring the lead is to put the HSD on the smallest resolution possible (8 miles) then expand it twice, this will give you a very zoomed in picture of your surroundings and you’ll be able to see who is flying around you.
- Lastly, if you go into air to air mode and then press 4 on your keyboard while looking around you will snap to the closest air contact and focus on it, this is referred to as padlocking and can be disengaged by pressing 3. Use this when you know in spatial terms where your lead is supposed to be but you can’t see him exactly.
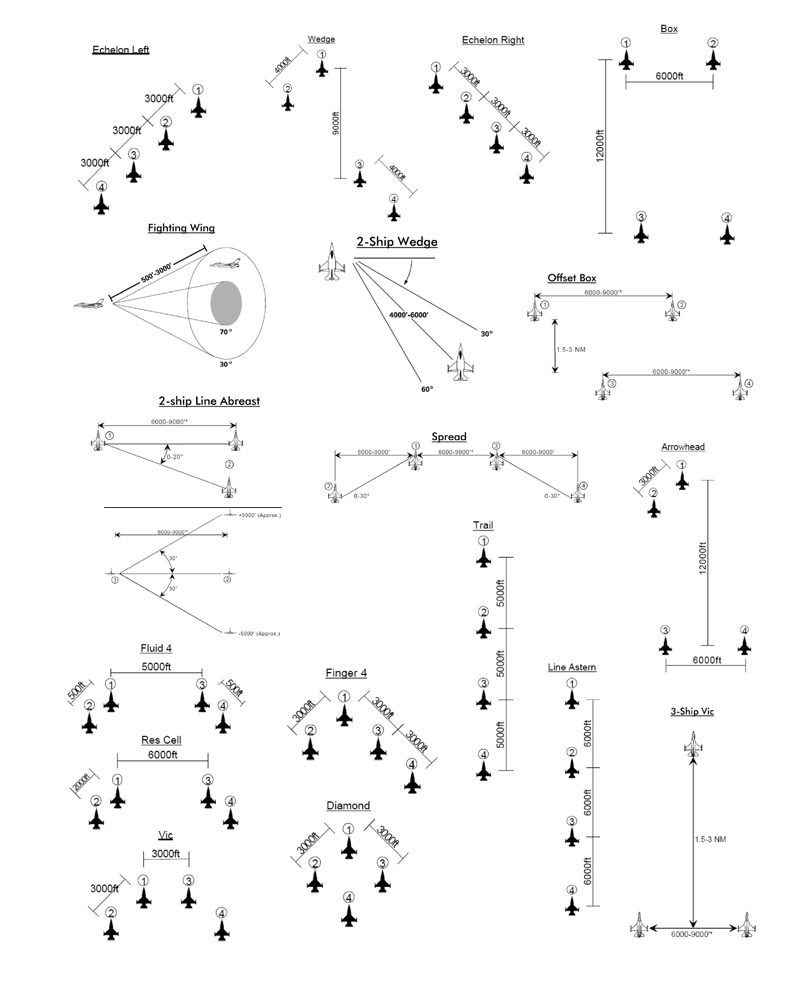
Formations
Learn these formations - learn finger 4, which is the default formation you should always assume the flight is in unless the lead says otherwise. Spread, trail, 3 ship vic and box are also very commonly used.
Brevity and Comms
Brevity is quite important. What is brevity? It means communicating complex information in the shortest amount of time possible. It also means keeping quiet when in combat situations unless you have something tactical to mention.
In UOAF we like to banter and keep things relaxed when we are doing a long flight returning to base or approaching enemy positions - but it’s important to maintain realistic brevity and combat discipline when “crossing the fence.” Failure to use brevity and the proper comms = getting yourself or others killed.
Teaching brevity is pretty challening because there are thousands of brevity terms. You are not expected to know all of them, only a few. Only a few will be used on a regular basis. Here’s some situations where you would use comms:
- When you take off, you say “wheels up” or “rotating” so people know you are going airborne and look to don’t smash into you
- “Check” or “reference” followed by a compass bearing or direction is an order to turn toward a different heading - such as “check left for steer two” means “turn left to heading facing steerpoint 2”
- You say “[callsign] saddled” when you are in formation
- You say “[callsign] fenced in at [first 3 numbers of fuel lb gauge]” - after lead orders the flight to “Fence in”, you also put your master arm on. “4 fenced in at 079”
- “Buster” means go full speed, +20% afterburner
- “Angels” refers to thousands of feet, “cherubs” refers to hundreds of feet
- “Flow [direction]” - head in that direction once you’re done doing whatever you are doing, “Flight flow south”
- “[callsign referring to] Knock it off”- stop doing whatever you are doing
- “Tally” when you see an enemy contact, can be amplified by stuff like “12 o’clock, 5 thousand, hot” and the like - “no joy” when you can’t see it
- “Visual” when you see a friendly contact - “blind” when you can’t see it
- “Engaging” means you are attacking something with intent to kill it
- “Stripping [right/left/high/low]” means you are leaving formation to prosecute an attack - “stripped” tells your lead you are out of formation
- When you see a contact, “friendly” means friendly, “bogey” means unknown, “outlaw” means unknown assumed hostile, “bandit” means confirmed hostile
- “Hot” means something is coming toward you, “cold” means its going away, “beaming” mean its diagonal to you and attempting to create space
- You’d give a BRAA (pronounced “BRAH”) when referring to air contacts, which stands for bearing, range, altitude, aspect - such as “tally bandits, 12 o’clock, 8 miles, 4000, hot”
- “Defensive” means you or someone else is avoiding/trying to get away from a threat, “offensive” means an attacking posture
- “in from the [direction]” or simply “in” means you are beginning the terminal phase of a air to ground attack, “off” or “off hot” means you are no longer attacking
- “RTB” means return to base
- “Joker” means I will be “bingo” soon. Bingo means your fuel status is such that if you don’t turn around right now you won’t have enough fuel to RTB
- “Fox 1/2/3 [bullseye position] [amplifying information]” When you fire a semi-active radar, infrared and active radar missile respectively. This goes on package coms. So people don’t get blown up and know it’s a friendly missile in the air. Commonly “Fox 3 medium, bulls 047 for 63, 3000”
- “[callsign] Buddy spike [bullseye or posit]” when a friendly is locking onto you and you don’t want to die
- “[callsign you are referring to] Break left/right/high/low” Call to immediately make a high G manuever in the direction. This is often called when you see a missile or other threat about to hit the friendly and need him to move quickly out of the way.
- “[callsign] supporting” means the callsign is supporting the other element which just said its engaging or in
- “nails” is a call when you have an enemy radar on your RWR, “spike” when the radar is tracking or launching on you. “Nails sa-6, right 2 o’clock!”
- “Cap/capping” means a callsign is flying “combat air patrol” or cover on the target area.
- Say “[your callsign] tumbleweed” to indicate you have lost all situational awareness and need guidance
- …and a lot more
Basic rules:
- Whenever you start a mesage not directed toward others you start with your callsign. On flight comms (where only 3 other players will hear you) you use your number 1-4, on package comms, where everyone will hear you, you use your full callsign.
- Whenever you send a message to someone else, start with their callsign, followed by your callsign. “python 21, this is serpent 51, in from the south, engaging tripple A at bullseye 040 for 63”
- Don’t use “over” or “out”
- Don’t use “break”
- Don’t obsess over the brevity terms, if you don’t know the terms just blurt something out which is quick and contains as much information as possible
- Whenever lead gives you an order, respond with your callsign - and respond in order, only skip someone’s turn if the guy before you did not check in after 5 seconds or so.
- When your being attacked give an engaged defensive call
- When you are attacking give an engaging call followed by the BRAA of the target.
Examples of good comms:
-
Air to Air - these were chosen because it demonstrates that if you don’t use brevity, you can’t be effective. Imagine trying to give long sentences during these intense engagements.
-
Air to Ground
What do I do when this happens?

The only other thing I could think to cover are specific events that you might find yourself in and not be sure what to do. Here’s some hints for a variety of situations.
You spot a radar contact on your FCR
Look at your RWR. Do you have anything? If so try to correspond the contact to the radar emitter. If not, is the target intercepting the flight or is it going really fast? It’s probably enemy, monitor it for a few seconds and if it continues, give a bogey or outlaw call, and give a BRAA to it. You can also quickly refer the lead to it by using the assign feature of the datalink. DO NOT DECLARE THE CONTACT WITH AWACS, LET THE LEADS HANDLE THAT.Someone starts shooting AAA at you
So you start seeing explosions all around you. If it’s radar guided (see an A with a diamond on it on your RWR?) your only choice is to drop altitude rapidly, build up speed and burn out of it’s range. If you go below 2000 feet ATL, it can’t engage you, but you are also exposed to a myriad of dangers and potential enemy ground units. If it’s optical guided, you may be able to simply gain altitude or jink in the vertical (changing altitude up and down) until you are out of its range. It will be unable to engage you above 30,000. In eithercase, give a defending AAA call.An enemy scans you on the RWR
Give a nails call.An enemy locks/tracks you on the RWR
First - if the enemy is in the outter ring of the RWR, stay calm. Report a spike, if it comes within the next ring, go defensive (quickly turn away from it and get it to your six) and give a defensive call. If the enemy is in the inner ring or close to the inner ring, you need to break away from it, burn and start looking for missiles or the contact visually while dropping a healthy serving of chaff and flare. If the enemy is very close, try to keep him on the beam if possible rather than directly at your six.Your lost and don’t know where you are
First, give a tumbleweed call. Next make sure you are safe - not about to die. Once you are relatively safe, go heads down, check your HSD and look for others on the datalink. Always flow toward the FLOT until you acquire friendlies. If you are lost because you lost your avionics from damage, trim out your plane and climb, look for landmarks and start relaying them. Use your instruments if they still work.Your approaching confirmed hostiles
Make sure you go into the burn and try to gain as much altitude as possible, but not at the expense of speed. Going slow is a death sentence when merging on enemy.YOu see a SAM/missile launch
First, consider if it’s been fired at you. You’ll know this because if its tracking onto you you will see it arcing toward you, and if its on a pure pursuit it will appear relatively motionless. At this point you should do a hard g break away from the missle, build up as much speed as possible by diving and employ countermeasures; give a engaged defensive call. The RWR is also a clear indicator that a SAM has been fired at you. Other SAMs are infrared guided and will NOT give a RWR warning. In this case the SAM will be tracking you if it flies directly toward you on a true pursuit (straight line). Drop flares and break away from the missle.But what’s more important for this overall topic is what you do if you see a SAM and it’s NOT guiding on you. DO NOT JUST IGNORE IT - it’s about to kill a friendly aircraft. First visually acquire your lead in relation to the missile. If you can’t see the lead for whatever reason just watch the missile and it’s projected path. Yell on guard, “SAM LAUNCH [direction]” such as “SAM LAUNCH WEST!”. If you see the missile about to hit a friendly aircraft, give a break call in a direction which will likely kinetically defeat the missile. Also if someone calls a sam launch or spike, you should look for launches immediately. This is arguably the most important job of a wingman.
Your weapon won’t release!
First, check your master arm switch. It should be in the up position. If it’s not, you just learned a lesson, which is always to put your master arm up when you fence in. If your master arm is good, you are probably outside of weapon release parameters and using the weapon wrong. For instance, to fire an aim-120 you must hold down the pickle button, not just tap it. In CCIP air to ground bombing, if there is a hash line on the fall line then it’ll convert to CCRP if you pickle; there has to be no horizontal line going through the fall line for it to instantly come off the rack. etc.You just heard a loud explosion/cracking noise!
You probably over-G’d or over-speed your airframe. The f-16 can pull 5 gs in category 3 conditions and 9 gs in category 1 conditions. A mistake of new people is to pull very hard on the stick when they are being threatened - but watch your G (displayed at the top left of the HUD). If you over g or over speed too much you can actually break your FLCS system which will make your aircraft difficult to control. Over speed conditions are 600 knots in cat 3 and 700+ knots in cat 1.Category 1/3 can be changed by the cat 1/3 knob on the left side of the cockpit, to the left of the MFD. Cat 3 is intended for manuevering when the airframe has wing tanks or air to ground stores - cat 1 for when there is only air to air ordnance or a store on the centerline.
You keep getting killed trying to do air to ground attacks
First, when you go below 10,000 feet your chances of being killed increase by an order of magnitude. The maximum engagement altitude of self-propelled AAA and generation 1 manpads (like the SA-7 strela, the most common DPRK manpad) is 9,000. Certain systems such as the SA-13, SA-8, SA-16 and SA-9 can engage up to 15,000 feet.Your main mistake is that you probably come in on a target with too much “slant range” - that is, you nose down too early and probably get to about 8,000 or 7,000 by the time of weapons release. It’s better to ingress at higher altitude then pitch down sharply 40 degrees or so at 3-5 miles distance, then come off with the added speed well above 10,000. Circumstances vary of course - sometimes you can go down below 10,000 and strafe targets with your cannon at 3000 feet! That being said, you are too much of a noob to realize when situations such as that occur and should always stay above 10,000. When you hear “altitude, altitude” you should pull up and do another pass. Also, if you do for whatever reason pass below 12,000 - start popping flares.
You don’t know how to deal with individual threats
See this: http://www.krauselab…_quickguide.pdf…please post more scenarios like this if you want some tips, I draw somewhat of a blank on this larger topic.
-
Very good!
-
I like the pic from Georg - just reminde me of somebody - the guide is great
-
lol! that picture of o’l George is funny as ****.
-
A question: Usually I do not see the incoming missiles, so how do I know which one is coming?
Once, I have been surprised by a missile coming towards me in front of the nose of the ac, i was looking around and suddenly i saw it and I tried to evade, but it was too late. AC destroyed and I was KIA. I can not say if it was luck to see it because I couldn’t evade, but it was luck to SEE it….
Thanks for your Guide, and all your videos.
Regards Metalhead -
And don’t forget rule #1 : it’s a game and you are playing it to have fun !
-
It’s an awesome guide!
Would you allow me to translate it to Spanish and post it in our forum as “Krause beguinner’s guide”??? (Guia para novatos de Krause).
I will give post a link afterwards here so you can review and I will be respectful with the content and format.
-
I would like to ask the permission as well to translate and post on a Brazilian squadron web site giving the credits to you Krause, of course…
Regards Metalhead