Warthog slew button review
-
I picked up the “Deltasimelectronics” slew button last year and agree it was a great improvement. Highly recommend it as well.
I did not have any issues after completing the calibration process, hope you get that sorted.
-
Thanks, Sarge. Did you use the Thrustmaster Calibraton Tool when you installed your slew?
Proud member of the BMS Other Fighters Mafia, join us at Discord - https://discord.gg/WDFhckSnzv
The Mafia Files(Mediafile)- https://www.mediafire.com/folder/fr34rj0apgr4j/BMS+Mafia+Files
Mafia Files(Gitlab)- https://gitlab.com/musurca/bms-mafia/
"You see, Iron Hand's my thing". And, "SAM's, if they're in a million pieces, they're suppressed". Also, known to be Koan -
Deltasim mod is worth the wait (usually he’s a month or two out for shipping). Makes a huge difference.
All you should need to do is check the “invert” box in the setup for the y cursor.
-
Also make sure to use the new axis shaping feature in BMS 4.34Ux, it really improves the axis response.
All the best,
Uwe
set g_nAxisExp_AXIS_CURSOR_Y 60 // Axis exponential curve. Should be in 0 - 100 range. 0 is disabled (default)
set g_nAxisSat_AXIS_CURSOR_Y 0 // Axis saturation. Should be in 0 - 99 range. 0 is disabled (default)
set g_nAxisExp_AXIS_CURSOR_X 60 // Axis exponential curve. Should be in 0 - 100 range. 0 is disabled (default)
set g_nAxisSat_AXIS_CURSOR_X 0 // Axis saturation. Should be in 0 - 99 range. 0 is disabled (default)System specs: win10pro / Linux Mint 21.x, 32GB RAM, RTX3070, 2x1 TB SSD, 1x2TB NVMe, 1x4TB SATA; HOTAS Warthog Stick(DX), WinWing Orion2 Throttle w/ f16 grip, TM MFDs, CH Pro Flight Pedals w/ custom USB controller; CPU: AMD Ryzen 7 3700X 8-Core; MoBo: X570-A PRO (MS-7C37); Display: 42" LG Nano 42 (2560x1440), 19" Fujitsu-Siemens (1280x1024) used for DE /w YAME64 beta; DelanClip /w PS Eye, opentrack; GameTrix JetSeat /w SimShaker Wings; Stream Deck XL (32 buttons) as ICP
-
I used the one he recommended in the instructions. Pretty sure that was the one.
-
just got a warthog, so i am learning…loads :typing::frusty: is this throttle fwd middle little joy stick thing that you use to slew the FCR curser?
many thanks for being patient with me, still trying to set it up…
John.
-
Hi John,
Yep, that little annoying “nipple” thing is the cursor slew.
Go and order the Deltasim upgrade when you can afford it. Lead time for delivery is roughly 2 months, so that will give you plenty of time to use the stock cursor slew control and realise that it is a hot mess of garbage.
Cheers,
PegasusSystem Spec: Win10, Ryzen 5 5600x, Radeon 5700XT, MSI B550 Tomahawk, 32GB (2x16) RAM 3600MHz, 1TB M.2 NVMe (Windows), 500GB SATA SSD (Games), 1TB HDD (Tools), Samsung Odyssey G9 49" 1440p, 850W PSU
TM Warthog, TM MFDs x2, Logitech Pro Flight Rudders, Delanclip running OpenTrack, VoiceAttack with JanJan profile
-
Hi John,
Yep, that little annoying “nipple” thing is the cursor slew.
Go and order the Deltasim upgrade when you can afford it. Lead time for delivery is roughly 2 months, so that will give you plenty of time to use the stock cursor slew control and realise that it is a hot mess of garbage.
Cheers,
Pegasuslol might have map another, only found out yesterday, thank you MAx, that the TMS up locks your target:woohoo:
…is it just me, or are more instructions needed to be published to help complete noobs like myself when coming in and getting their first HOTAS set up?
John.
-
+1 for Deltasim upgrade. Incredible piece of kit. Order now or wish you’d ordered now
")
-
I can attest.
I have one, and wouldn’t want it any other way")
-
Deltasim.
Only way to go :headb:
-
ordered:bdance:
John
-
-
Apologies for butting into a TM thread as an X55 owner but I wish such a mod was available for my throttle; I suspect the ministick is even worse than the WH one! I ended up sticking one on the outside of the throttle with it’s own arduino board so it shows we’d all be happy to pay a few more £’s just to not have crappy switches on our already ‘fairly’ expensive HOTAS hardware. It does my head in to think manufacturers thought this was an acceptable economy to make

-
-
Apologies for butting into a TM thread as an X55 owner but I wish such a mod was available for my throttle; I suspect the ministick is even worse than the WH one! I ended up sticking one on the outside of the throttle with it’s own arduino board so it shows we’d all be happy to pay a few more £’s just to not have crappy switches on our already ‘fairly’ expensive HOTAS hardware. It does my head in to think manufacturers thought this was an acceptable economy to make
Hi, Javelin,
Yep, I had the x-55, then the x-65 for a loooong time, so I feel your pain. I never got happy with either as the cursor, and don’t even get me started on cursor enable . My final solution was to set the microstick as banded and set it up as a 2 way for speedbrake.
And, Arabianjules, how are you liking the slew? -
I’ve had mine for about 3 weeks but just installed today:


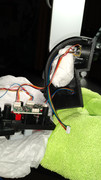


Install went pretty well, I think the toughest part for me though if I had to pick was removing the old sensor with squeezing those tiny little labs in a tight area but got it out ok after a few tries. When reattaching the side panels, check out that magnetic pull on the bottom most screw! In the last pic, I have large hands but the middle part of my index finger hits the HAT top just perfectly for button (Cursor Enable) activation. Many thanks to Delta Sim Electronics for such an awesome and welcome mod!
-
i have also upgraded to replacing the
ABgate, so its now a stop, that you can then go through into ABJohn.
-
Also make sure to use the new axis shaping feature in BMS 4.34Ux, it really improves the axis response.
All the best,
Uwe
set g_nAxisExp_AXIS_CURSOR_Y 60 // Axis exponential curve. Should be in 0 - 100 range. 0 is disabled (default)
set g_nAxisSat_AXIS_CURSOR_Y 0 // Axis saturation. Should be in 0 - 99 range. 0 is disabled (default)
set g_nAxisExp_AXIS_CURSOR_X 60 // Axis exponential curve. Should be in 0 - 100 range. 0 is disabled (default)
set g_nAxisSat_AXIS_CURSOR_X 0 // Axis saturation. Should be in 0 - 99 range. 0 is disabled (default)Good Day,Hoover and All.
I’ve been noticing lately that when I’m in the heat of the moment, it’s difficult for me to have fine control of my Warthog’s throttle cursor. I remembered this post, and decided to try these values. I thought it might be in the CFG file, but no. I noticed the axismapping and axismapping_tmp files in User>config but those files don’t have plain text data. I RTFM’d 4-49 of the Manual, but didn’t find what I was looking for.
So, I would appreciate some help on where to place these values
Also, is there a way to make the throttle cursor a 4-way switch without TARGET?Proud member of the BMS Other Fighters Mafia, join us at Discord - https://discord.gg/WDFhckSnzv
The Mafia Files(Mediafile)- https://www.mediafire.com/folder/fr34rj0apgr4j/BMS+Mafia+Files
Mafia Files(Gitlab)- https://gitlab.com/musurca/bms-mafia/
"You see, Iron Hand's my thing". And, "SAM's, if they're in a million pieces, they're suppressed". Also, known to be Koan -
Good Day,Hoover and All.
I’ve been noticing lately that when I’m in the heat of the moment, it’s difficult for me to have fine control of my Warthog’s throttle cursor. I remembered this post, and decided to try these values. I thought it might be in the CFG file, but no. I noticed the axismapping and axismapping_tmp files in User>config but those files don’t have plain text data. I RTFM’d 4-49 of the Manual, but didn’t find what I was looking for.
So, I would appreciate some help on where to place these values
Also, is there a way to make the throttle cursor a 4-way switch without TARGET?those values go into the falcon bms.cfg file. You have to add them manually yourself
You will not find it in one of the manuals yet as the introduction was with BMS 4.34 U1You’ll find the documentation on this feature in the changelog of U1 section 2
https://www.benchmarksims.org/forum/showthread.php?37763-Falcon-BMS-4-34-U1-Incremental-Installer02. Falcon BMS.cfg changes:
CLOUD DENSITY & CELLS:
— Cloud density and number of cells are now configurable via cfg. (r19870)
That will override all sliders or map settings. This can help to save FPS.- g_nFairCloudRestriction from 0 to 4 (default 0)
0 Standard model, from UI slider / Weather Map or Server Setting
1 reduces the number of cells displayed from 9 to 4
2 forces the density to max 3/8
3 forces the density to max 2/8
4 forces the density to max 1/8 - g_nPoorInclCloudRestriction from 0 to 3 (default 0)
0 Standard model, from UI slider / Weather Map or Server Setting
1 reduces the number of cells displayed from 9 to 4
2 forces the density to max 6/8
3 forces the density to max 4/8 - added g_nFairCloudRestriction and g_nPoorInclCloudRestriction (both set to default 0/false) in the “Config.exe Settings” section (r11067)
— As this will force a different cloud display between server & client the server can allow or deny this by using g_bForceMPCloudSettings (default false) (r19870) - Falcon BMS.cfg: added g_bForceMPCloudSettings (default 0/false) in the “MP Settings” section (r11067)
AXIS SETTINGS:
— Added possibility to set exponential curve and saturation for axis. Should help players with less precise controllers. (r19978)
set g_nAxisExp_AXIS_PITCH 0 // Axis exponential curve. Should be in 0 - 100 range. 0 is disabled (default)
set g_nAxisSat_AXIS_PITCH 0 // Axis saturation. Should be in 0 - 99 range. 0 is disabled (default)
set g_nAxisExp_AXIS_ROLL 0 // Axis exponential curve. Should be in 0 - 100 range. 0 is disabled (default)
set g_nAxisSat_AXIS_ROLL 0 // Axis saturation. Should be in 0 - 99 range. 0 is disabled (default)
set g_nAxisExp_AXIS_YAW 0 // Axis exponential curve. Should be in 0 - 100 range. 0 is disabled (default)
set g_nAxisSat_AXIS_YAW 0 // Axis saturation. Should be in 0 - 99 range. 0 is disabled (default)
set g_nAxisExp_AXIS_CURSOR_Y 0 // Axis exponential curve. Should be in 0 - 100 range. 0 is disabled (default)
set g_nAxisSat_AXIS_CURSOR_Y 0 // Axis saturation. Should be in 0 - 99 range. 0 is disabled (default)
set g_nAxisExp_AXIS_CURSOR_X 0 // Axis exponential curve. Should be in 0 - 100 range. 0 is disabled (default)
set g_nAxisSat_AXIS_CURSOR_X 0 // Axis saturation. Should be in 0 - 99 range. 0 is disabled (default)Maybe because I’m a software dev but I regulary read any change log of any software update before i apply it
Spec: AMD Ryzen [email protected] GHZ, MB MSI Tomahawk, 32GB RAM, 500GB NVMe EVO 970 SSD, 2 TB HD, GTX1660TI,3x24'' Full HD Screen, 15.6'' Touchscreen (Helios MFDE), Saitek X65F, OpenTrack+PS3 Eye+IR LED, DIY Build Rudder, Brake Pedals
- g_nFairCloudRestriction from 0 to 4 (default 0)