Requesting publishing rights.
-
Latest little addition, the FS tail code was missing the belgian flag, i added it and i made the tail code more visible:
The flag looks a bit different than on the original work from Janhas, i redid the colour pixel per pixel and also redimensioned it, the flag is more thin on the real jet, this what i tried to reproduce here.


-
Hey Spooky,
One small detail that I found while upgrading some skins for my modded folder. The GBU-12 bomb casing has only one yellow stripe on it:

I have adjusted it to reflect this in my modded folder. The DDS number for the bomb casing is 1321.dds if you want to make the adjustment. Nice job on the LM version! I’m looking forward to including the skin in my Balkans upgrade folder!!
-
Thanks a lot for the info mate, i really appreciate the intention and input
")
-
Looks pretty good for just a few days skinning.
Yes, b’y you need to not see every comment as an attack. Pumpy is one of the nicest fellas to work with. He’s a real gentleman and I have never seen him post in a negative manner. He is truly a template for anyone posting on forums.
Get Photoshop and continue to learn skinning.
-
Thank you Bonedust :), will follow your advice.
-
Here i present some shots showing the evolution on the work on the belly, i changed the colour and marked a bit more some panels and made it more dirty, i also worked on the FS tail, colour, the upper part of the fuselage has been re-coloured too, but the dirty marks are more subtle (we also have clean F-16’s in Belgium ). The GBu-12 with the LM kit, as you can see the colour has been reworked, it was to light grey according to my eye. All WIP, the weapon skins for the AIM-120 and AIM-9 are available for who wants them.
Janhas and BMS team gave me the right to release my reskinning attempts for their respective models, credits to them, and thank you for letting me train my hand on them.
Belly:


FS tail:


GBU-12 evolution (still not happy with it)


-
(still not happy with it)
Hahaha, spooky, THAT’s the correct attitude for an upcoming skin artist.

…. looks great for just a few days in skinning.
")
Cheers,

LS -
Thank you mate. The problem is that you see a lot of different pictures all taken with a different exposure to light, so i will only get the right colour for a certain light setting, i try to hit the middle, not too light, not too dark. The other challenge for me right now is to figure out which part goes where, the skins when you edit them appear unfolded, and you have to test until you know, aha this panel is this one. I am really enjoying it, because i love art, and i feel like i do something for my beloved F-16 :oops::oops:, i just can’t stop being thankful for BMS to exist.
-
GBU-12 with GAU-169 H/B

-
Thank you mate. The problem is that you see a lot of different pictures all taken with a different exposure to light, so i will only get the right colour for a certain light setting, i try to hit the middle, not too light, not too dark. The other challenge for me right now is to figure out which part goes where, the skins when you edit them appear unfolded, and you have to test until you know, aha this panel is this one. I am really enjoying it, because i love art, and i feel like i do something for my beloved F-16 :oops::oops:, i just can’t stop being thankful for BMS to exist.
Hey Spooky,
Here:
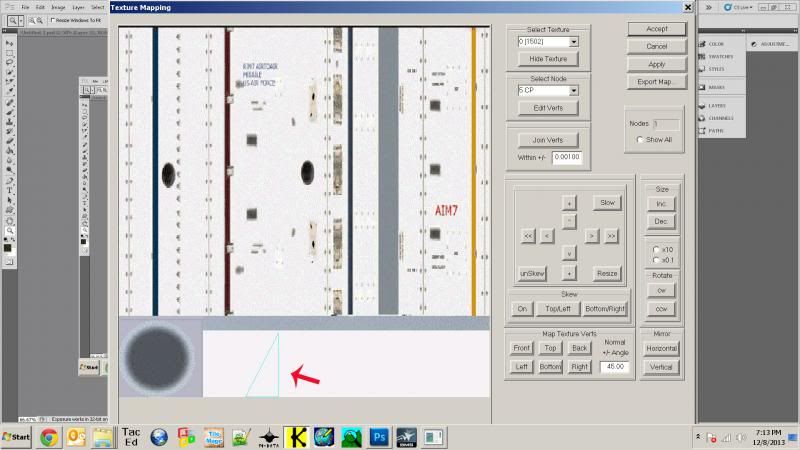
I’m glad to see your work and applaud Pumpkin Head and Jans help in your endeavours……sadly lacking in other areas…Joke Gent’s…LOL!!!
The Pic above is just meant to show how we get the Texture Data drawn on the Model…Node On,Node Off…you are getting sleepy,no???
Hope it helps,
Demer -
Thanks Demer :), i appreciate the help mate. Yep i see now how it is done, kinda understand how to get there now.
I was not expecting so much support from the true Artist community, i am very surprised in a positive way, i don’t want to be a bush fire, i mean i just got Photoshop today following Bonedust advise. I must say it makes it easier, and here are the stuff i did under photoshop, still WIP but getting there better and faster by using both Photoshop and he Gimp. Some tools i prefer in the Gimp,especially for pixel by pixel editing, i prefer photoshop for changing the colours and selecting multiple objects and the layer management.
First try outs with Photoshop
:Evolution of the nose and front section skin.


-
Any news about the release?
-
Yup, i have the rights to release Janhas and BMS based work, PM me about the skins you want :). Just for info the MLU skins are not available at the moment, only the one on the last picture is.
-

-

-
Able to share those nice skins sir ?
-
yup, send me your e-mail via pm and i will send them to you tonight :). Thank you for the interest.
The skins will include, AIM-9M/120B live and training skins.
ALQ-131 belgian air force skins for Janhas ALQ-131 model
GBU-12 and GBU-10 with LM kit, live and training skins, this also affects MK-82’s and 84’s skins
AGM-65G skins.
-
Latest update :


-
I had to spend some time to learn how to use Photoshop.
My main objective is to be able to do a Dirty Belgian MLU, that looks realistic. It’s quiet some work, since I have no graphic skills, I had to learn how to texturize and how to play around with some lights effects and variations in color density.
Here is what I came up with, those are all WIP, but I am getting there.
I tried to give the dirt this dusty effect, with some spots being more or less clean, my first mistake was to make all panels dirty (thanks to amraams remark I took another route). After fumbling around with PS, and taking some advices from Foxtail (thanks a lot mate!) I found myself having very different results.
For the first time I was … proud of my work,and decided that now I could show what I was doing, instead of just showing mediocre work (to my standards).I have for next project to do a have glass skin, I will base my work on the jets from the 480th FS (Block 50), but let’s finish the MLU’s first, and oh, I also figured out how to do some tailart work, was interesting to see how you can play around with PS …very powerful, I also made the painful mistake not to save my work under PSD …lost all layers
 … but steep learning curve that keeps me challenged, I love it.


Here is the original picture I inspired myself from:

Another thing that I learned by fire, is that it is fare more easier to work from a picture taken from one specific airplane, than trying to take many pictures of the same airplane. For example for dirt, the patterns are specific to each airplane, so I recommend to anyone trying to do dirt or texture work, to take one picture, that shows the areas you want to work on, and focus on that sole picture, else you end up like me, burnt after 2 days of frustration. So yeah, I tried with one example only, and it was far more easier.
Also did some tailart work … to have an idea, I also put the original picture from which the Celtic warrior was taken from to be applied on the tail.


-
looking already quite good imho Spooky.
If I may give you a PS tip: you could grain/pixelate an area/layer (with sand color perhaps?) and choose and high density for this (eg for the worn part of the inner wing to work on - because all over the skin is still quite clean), then use motion blur to smooth it out again, and apply this to the already made skin texture. Probably looks best with transparency set to around 65%. Play with color blending a bit for best effects.
Hope it inspires you work further,
Regards,
Fan