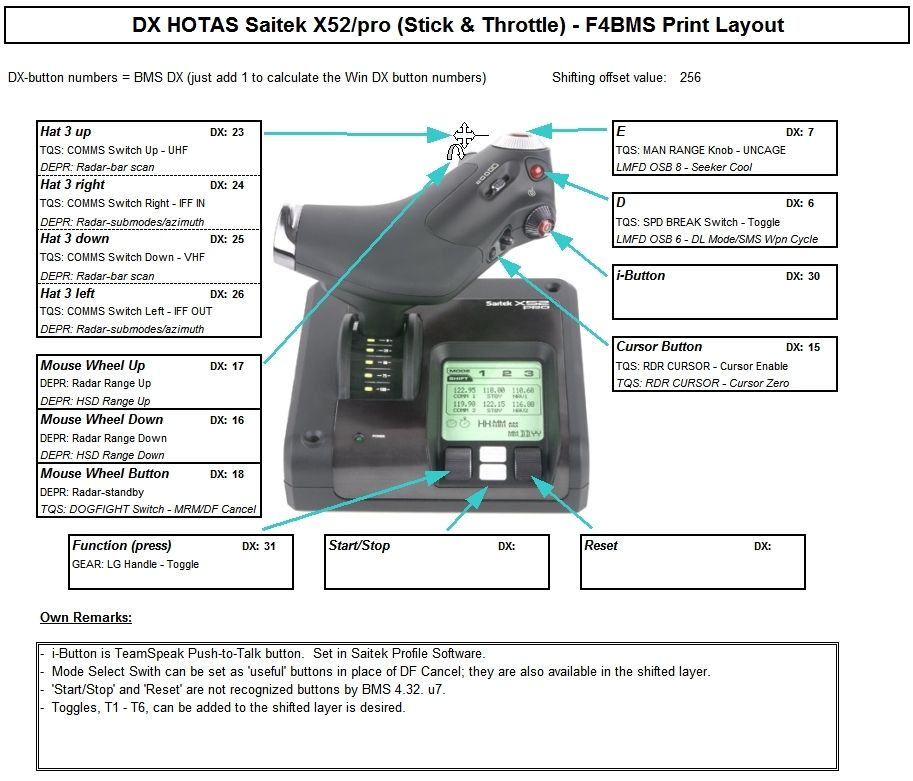
X52 Pro DX Profile for BMS 4.32
-
Hello. I apologize for my English, I write through an interpreter. Joystick Saitek X52pro. Problem: does not work DX Shift key. How to install HotasPinkyShiftMagnitude? If possible detail. Thank U.
-
Hello. I apologize for my English, I write through an interpreter. Joystick Saitek X52pro. Problem: does not work DX Shift key. How to install HotasPinkyShiftMagnitude? If possible detail. Thank U.
In this profile the shift key works fine, but in an unintended way …. it is ‘on-off-on’ instead of momentary. I don’t not know why or how to make it momentary.
….
I am having one other problem with this profile. Well, I think it is a problem. When I depress the pinky switch the button stays asserted even after I release the switch. When I depress the switch again, the button stops asserting. All the shifted functions do work correctly when the pinky switch is in its asserted state. I am using your key and profile files without any modifications. Is this the intended behavior? I was expecting that using shifted functions would require the pinky switch to be held down, and when released it would go back to unshifted functions.It’s neither intended nor unintended. It’s just the way it happened, not the result of planning.
I had assumed the pinky switch would be momentary (had to be held), but when I applied the DX command and used it, it was an on-off-on switch. I just assumed that was how it was ‘supposed’ to be.
Maybe someone with a DX ‘pinky shift layer’ on another application would be able to say if it’s the same there.
-
i think its because in the sst the pinky switch is latched
i have used your profile as a template and have the pinky switch working as it should(quick press for expand or hold for shift)
the only changes to your profile i have made is MPOHOLD on button B and STEERPOINT NEXT & PREVIOUS on shifted T1&T2
A very good profile though thank you for sharing your work

-
i think its because in the sst the pinky switch is latched ….
I’ll have to look at that. Thanks.
And thanks for your kind words.
")
-
Have you found the problem yet
-
i think its because in the sst the pinky switch is latched
i have used your profile as a template and have the pinky switch working as it should(quick press for expand or hold for shift)
….I’ll have to look at that. Thanks.
And thanks for your kind words.
Have you found the problem yet
Sorry, I’ve been out of town.
The pinky switch was ‘latched’ in the SST software. I’ve un-latched it (deselected) and will give it a try tomorrow.
-
-
-
This post is deleted! -
i think its because in the sst the pinky switch is latched
i have used your profile as a template and have the pinky switch working as it should(quick press for expand or hold for shift)
….
Yes, ‘unlatching’ the pinky key works. The BMS pinky shift now works as it should …… short press = change FOV/Zoom for that SOI and long press (held) = DX shifted button layer. Releasing the pinky button reverts to the unshifted DX state.
This free’s up several keys for me now and I’ll have to think about how to re-assign them.
Thanks.
-
Hi,
I’m using this profile in BMS. Does the job, thanks!
Now I also have two Thrustmaster Cougar MFD’s and I’m looking for a .tmc (i think?) file for the TARGET GUI.Does anyone have one to share or can he point me in the right direction?
-
life saver ty
-
I have updated this DX profile based on:
i think its because in the sst the pinky switch is latched
i have used your profile as a template and have the pinky switch working as it should(quick press for expand or hold for shift)
….
Yes, ‘unlatching’ the pinky key works. The BMS pinky shift now works as it should …… short press = change FOV/Zoom for that SOI and long press (held) = DX shifted button layer. Releasing the pinky button reverts to the unshifted DX state.
This free’s up several keys for me now and I’ll have to think about how to re-assign them.
Thanks.
Files zipped an available for download:
- BMX DX Generator Spreadsheet (Kolbe);
- Flounder X52 Pro v3 keyfile;
- Flounder X52 Pro Saitek Profile;
- Stick and Throttle layout as PDF and as JPG;
- Read Me copy of BMS Forum Posts.
DOWNLOAD HERE: http://firstfighterwing.com/VFW/downloads.php?do=file&id=91 (Sorry, but you have to register at 1st VFW to access Public Downloads)
Most of the first post applies. The following DX key assignments have been changed/updated:
-
Toggle 1 & 2 (DX 8 & 9): Added Laser Switch Arm and Off to the shift layer;
-
Pinky (DX 5): Pinky now works as FOV on short press and Shift when held; reverts to Unshifted layer when released;
-
Button B (DX 3): Removed Pinky FOV; Moved NWS/Missile Step to Unshifted layer;
-
Button A (DX 2): Moved TrackIR Recenter to Unshifted layer; added TrackIR Reload to Shift layer;
-
Mode Switch (DX 27, 28 & 29): Rearranged to take advantage of this great tip: https://www.benchmarksims.org/forum/showthread.php?21074-Jojcib-Falcon-BMS-Let-s-Play&p=309157&viewfull=1#post309157
…. Consider flying the entire ingress in MRM override with AG master underneath. Then drop out of MRM to do your AG work and switch back to MRM (or even dogfight) every time a weapon is released as you recover. …
So, NAV/AG in the middle position, MRM/AA in the lower position and DF override in the upper position. Fly typical ingress/egress in MRM; Flip to NAV/AG as needed. Brilliant!
Changes Highlighted in Yellow
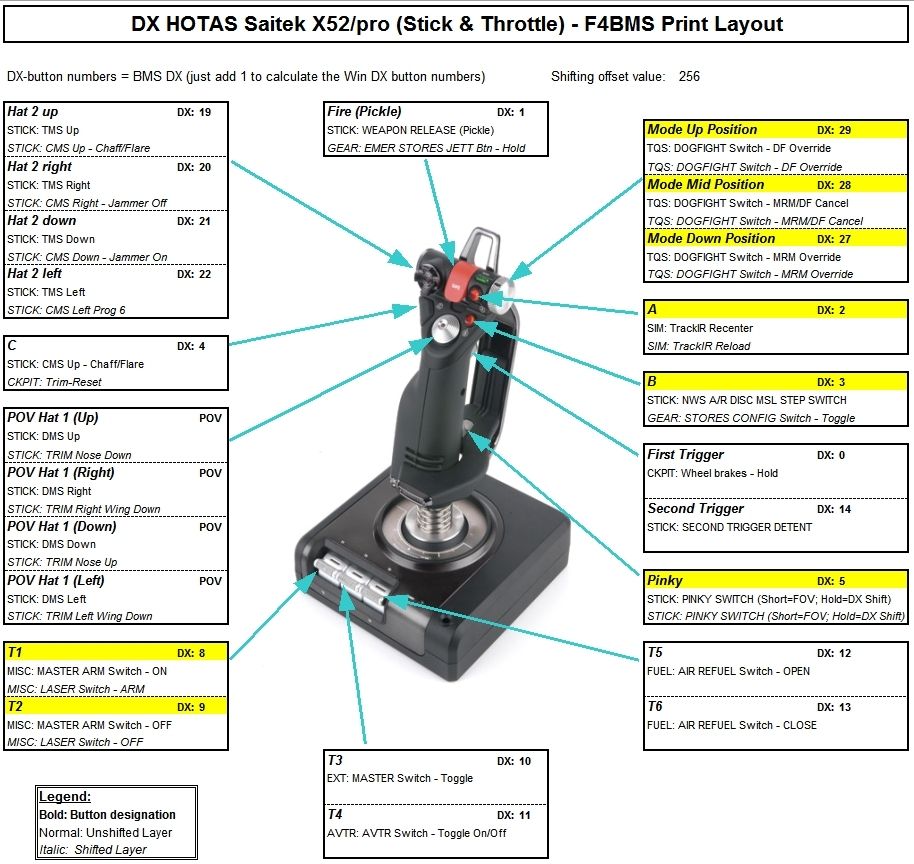
DOWNLOAD HERE: http://firstfighterwing.com/VFW/downloads.php?do=file&id=91 (Sorry, but you have to register at 1st VFW to access Public Downloads)
-
I run the latest updated version of your really great profile Agave. Everything works as expected except the mini stick. The axes works fine in the saitek control panel but nothing happens when i try to move the radar cursor in game. Any thoughts or workarounds? Thanks in advance.
-
I run the latest updated version of your really great profile Agave. Everything works as expected except the mini stick. The axes works fine in the saitek control panel but nothing happens when i try to move the radar cursor in game. Any thoughts or workarounds? Thanks in advance.
Hmmmm …. no. The mini-stick is set to run from the Saitek .pr0 file. There should be nothing to set in BMS setup or anything like that. Let me look a little later when I have my HOTAS connected and maybe give you some ideas of what to check or look for to make sure the keybinds are OK.
Edit:
All I can suggest is to confirm the following:
Open the Saitek Control Panel and check that the mini-stick is recognized (I think you said you’ve done this):
Open the Saitek Profile editor and make sure your mini-stick bands looks like this, are named as ‘Bands’, set to ‘F8’, ‘F9’, ‘F10’ and ‘F11’ and light up when your move the mini-stick:
Open BMS and go to SETUP -> CONTROLLERS. Confirm you have the right keyfile loaded, then push ‘F9’ and you should see the commands for F9, F10, F11 and F8 and they should be cursor commands.
If any of those are different/not working in your setup, post where the failure is and maybe we can get it sorted.
If everything works, I’m not sure what the problem could be.
-
Thanks for the reply Agave. Checked all the steps u suggested and found out that the problem was a conflict between the default trackir hotkeys (pause-precision-profile) and the move and enable radar cursor bms keys. I assigned the said trackir commands to different keystrokes and now radar cursor works perfect! thanks a lot for the help
Excellent. That could be very helpful to others. Thanks for posting that fix.
-
As far as I can tell, this keyfile works fine in BMS 4.33. I’ve flown numerous campaign, TE & Instant Action missions without issue regarding the keyfile itself.
However, it maybe worth noting, that some callbacks are on the ‘out of date’ list. It’s also worth pointing out that there is no key or HOTAS command for manual laser firing, which is needed for the new buddy lasing/LST capability.
If you’ve been using this keyfile, just copy the file “Flounder X52 Pro v3.key” to the 4.33 folder: x:\Falcon BMS 4.33\User\Config. You will have to “LOAD” the keyfile in the BMS –> SETUP --> CONTROLLERS screen. You will also have to assign axes in ADVANCED section of that screen.
If you are using this keyfile for the first time, follow the instruction on copying the Saitek *.pr0 file, as well as loading the keyfile as above.
Latest changes are in this post: https://www.benchmarksims.org/forum/showthread.php?18522-X52-Pro-DX-Profile&p=315483&viewfull=1#post315483
I am working on a complete ‘re-build’ for 4.33, but the general functionality will remain very similar. I will post when (if) that keyfile is completed.
")