Input devices ergonomics
-
This is a really great char to build to replicate F-16 cockpit geometry without building a full cockpit -
http://www.xflight.de/pe_sim_sml.htm
You can cut two of these form a 4’ x 8’ plywood sheet - know because I’ve done it! Folds up too, so if you have limited room this is it.
May the bridges I burn light the way
-
This is a really great char to build to replicate F-16 cockpit geometry without building a full cockpit -
http://www.xflight.de/pe_sim_sml.htm
You can cut two of these form a 4’ x 8’ plywood sheet - know because I’ve done it! Folds up too, so if you have limited room this is it.
I ve tryied tris build, but it was unsuccessfull becouse i broke the first time i sat on it . Not strong enough for me, but surely i made some building mistakes. I could not understand well the plans
-
Find a carpenter to help you and build it from solid wood instead of ply. It will be heavier, but stronger. Otherwise, look over the web for measurements of the F-16 cockpit - or duplicate this geometry.
May the bridges I burn light the way
-
Just found tris one seems interesting…
https://www.dogfightboss.com/ -
…“F/A-18 ACES II”…yeah…right.
May the bridges I burn light the way
-
-
In the beginning, most cockpit builders simply scaled up dimensions from the old 1/12 Eschi F-16A cockpit model…which I happen to have in my own stash. But Martin’s “pit lite” is really the quickest geometry reference for a Viper setup.
-
Make a base for your seat, put your seat on it, then make two “boxes” that you can attach to the seat base. That’s the simplest way I can think of and occupies the least space.
-
This is a really great char to build to replicate F-16 cockpit geometry without building a full cockpit -
http://www.xflight.de/pe_sim_sml.htm
You can cut two of these form a 4’ x 8’ plywood sheet - know because I’ve done it! Folds up too, so if you have limited room this is it.
Stevie…
Any chance you could convert those plans to English (from metric) units? I can get them to inch’s in decimal, but can’t seem to get fractions -
Stevie…
Any chance you could convert those plans to English (from metric) units? I can get them to inch’s in decimal, but can’t seem to get fractionsI just use Google to convert mm to inches. But if you’re cutting yourself you probably have mm on the opposite edge of your tape measure and you can just use the dimensions directly. What I did was to lay out the lines on the plywood sheet for the whole chair, then cut.
It’s not difficult to do work in metric units - most of the replica hardware I have is metric…which presents the opposite problem for the people who make it - it’s originally in English, and they have to convert! So my cockpit is a real mix of metric and English standard parts/screws/etc.
-
This was my first-ever build….

Ideally, you won’t want to use an office chair like the above… makes rudder use awkward as you will rotate the chair when you push on the pedals. Another issue is to have the top of the tables LOWER than what you see above… but even on that setup, it was quite comfy to use. Definitely more comfortable than using the HOTAS on the desktop as you can see in the pic.
-


For this build, I eventually ended up drilling holes through the tops of the tables so that I could anchor the HOTAS to the table using screws. I also removed the WH stick baseplate so that the stick was closer to my leg. You can see on the last pic how I braced the two tables together. Not ideal, but it did make the setup more stable.
-
That’s a nice setup, Ice…what I’d suggest is getting one of those computer footrests to mount your pedals to - use zip-ties or Velcro. That should help stabilize the pedals, and is sort of what I do at my own desk setup.
One of the good things about using an adjustable office chair is that you can tilt it back…as Ice points out, make sure to get one that has locking wheels, or simply take the wheels off.
-
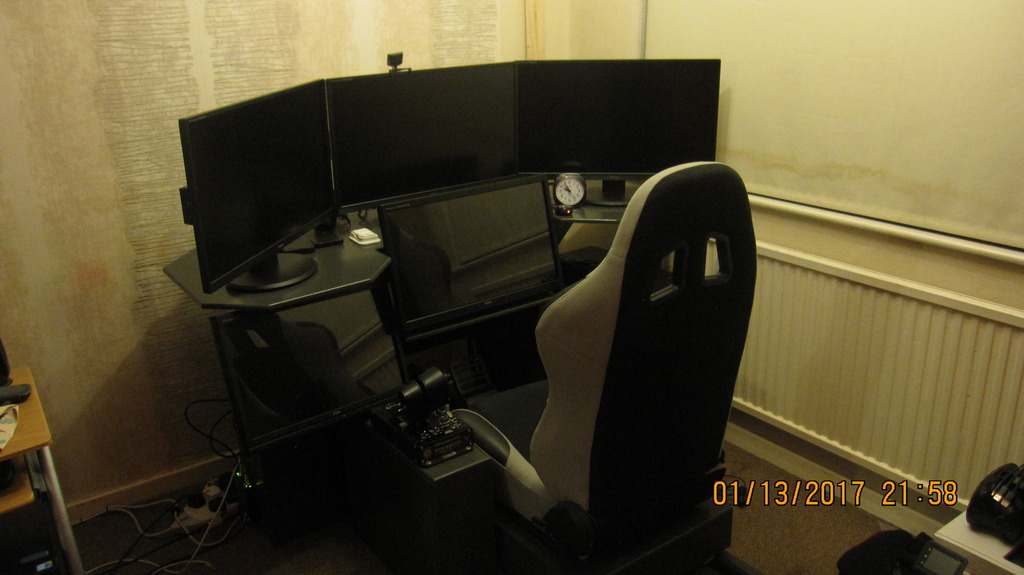
As you can see, those pictures were way back in 2011
")
This is the 2017 version…. and the car seat reclines as well…
-
Nice upgrades!
-
Very nice indeed… and black too for stealth purposes (when you spill crap on yourself)
I just use a wide/narrow keyboard table and an office chair. Old school and boring I know, but hey, I do have a real ACESII seat cushion!
:rolleyes: -
Thanks guys! It’s really not black but rather dark gray… but the lighting isn’t too great in the room plus looking at my monitor stands, there is very little difference in color between it and the simpit.
I do have a keyboard tray under that center touchscreen but it’s such a pain to use… so I just type with the keyboard on my lap.
")
-
Another question for correct positioning o monitor.
Should I put the gun cross at eye level or the horizon? -
In the real jet, there’s a function for that, but not implemented in BMS
Quote from -34:
Seat Adjustment for Design Eye. HUD symbology coincides with the real-world scene at the design eye position. To
find the design eye, a test pattern is available via the TEST switch on the HUD remote control panel (Figure 2-53). The seat
should be adjusted so that each test pattern bar can be clearly seen.
Seat Adjustment for Design Eye Procedures.
1. HUD remote control panel TEST switch - ON.
2. Boresight pattern - Select.
Depress the TEST switch once (boresight pattern appears on the HUD).
3. Seat - Position.
Position the seat up or down as required to position the triangle at the top and bottom of the HUD.For most pilots its a clenched fist between helmet & canopy. Watching several ramp starts in the past I’ve seen them do that a lot.
-
Thanks focal, but I was referring to my monitor height relative to my eyes.
The red line should point to the gun cross (as seen on the monitor and seems to be in the vertical center of it) or elsewhere?
Just to know if the pilot looking straight out in front of him will see the upper part of the hud or he shall lower a little the eyesight.