How to add your own squadron patch / pilot picture
-
If you want to add your own squadron patch or pilot picture to the sim, here’s a step-by-step howto:
1) Get a nice high-res version of your logo/patch:

2) Extract the actual logo, i.e remove the background, and scale it down in such a way that the longest side is 96 pixels (max 96x96):

Note: it is important NOT to use aliasing for the edges of the logo! BMS does not support “partial transparency”, i.e. a pixel can either be solid, or transparent. No “blending” between transparency and pixel color is allowed. Usually, this is achieved by scaling with “nearest neighbor” as opposed to the usual “bicubic”. So your scaled down logo should look like this:

3) Fill up the background - or anything that should be transparent in the final logo - with “pure magenta” (R 255, G 0, B 255):

Again, it is important NOT to use aliasing for the edges:

4) Save the final result as TGA/Targa file with 16bits/pixel and w/o RLE compression, and with a “.tga” extension:

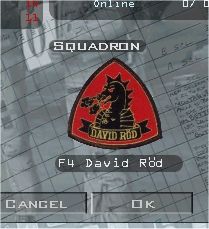
This file here is the result in my example case, just for your reference:
MyLogo.tga5) Copy the new file into the appropriate BMS directory.
For squadron patches, this would be:
<bms>\User\Patches</bms>For pilot pictures, this would be:
<bms>\User\Pictures</bms>6) Fire up BMS, open the logbook and the list of available patches should pick up your new picture automatically. There is NO NEED to fiddle around with “resource tools” or other stuff!

Enjoy your new patch!
")
-
wow ain’t that logo copyrighted? LOL…
//Arty runs and hides…
HOT LIST

System Specs:
i7-2600K @ 4.8 Ghz WaterCooled / 32GB Ram. 128GB SSD/1TB SSD / GTX1080Ti 11GB DDR5X / HOTAS COUGAR. TrackIR 4 / 3x24" Mon. (res:5760x1200) / Cougar MFD's / Wheel Pedals / Win 10 64 bit.

-
wow ain’t that logo copyrighted?
Indeed. However, it’s not “abused” to suggest some person/product is related to that particular company. So it’s treatable as a “valid advertisement”.
")
-
:rofl: slides like an eel…
HOT LIST
System Specs:
i7-2600K @ 4.8 Ghz WaterCooled / 32GB Ram. 128GB SSD/1TB SSD / GTX1080Ti 11GB DDR5X / HOTAS COUGAR. TrackIR 4 / 3x24" Mon. (res:5760x1200) / Cougar MFD's / Wheel Pedals / Win 10 64 bit.
-
niiice….
one question though. Is this a change in falcons behaviour? I had been under the impression that you had to add your file to another index file…
In the past I did get one patch into falcon, but then could not be bothered trying to replicate it!
It would be a lot easier to just have to put it into the directory like this. so… is this new, or just a heads up? -
this is the BMS way.
-
this is the BMS way.
yeah, I gathered that much actually. not what I was asking though. I was using BMS 4.32.3 before, and just putting the files there did not work, I am sure of it. This was why I wanted to confirm that this was a behaviour change, as opposed to just a heads up on how to get your pictures into falcon.
-
works that way from Vanila BMS , meaning before the updates. If they didn’t showed up then u had them in the wrong format - size…
I have them since Vanila and they work fine.HOT LIST
System Specs:
i7-2600K @ 4.8 Ghz WaterCooled / 32GB Ram. 128GB SSD/1TB SSD / GTX1080Ti 11GB DDR5X / HOTAS COUGAR. TrackIR 4 / 3x24" Mon. (res:5760x1200) / Cougar MFD's / Wheel Pedals / Win 10 64 bit.
-
It should have worked like this for BMS all the time. However, we had a code glitch so the maximum number of patches that BMS was able to handle was limited, and had essentially been exhausted by the internal patches already. With U4, the limit is much higher, so all your patches should show up correctly now.
-
thanks Dunc! I was sure it wasn’t working before… can’t wait to finish my windows reinstall and test this out!
happy new year everyone!!
-
Thanks!
-
Wow an hippocampus!!! Not a Vigen???
HOT LIST
System Specs:
i7-2600K @ 4.8 Ghz WaterCooled / 32GB Ram. 128GB SSD/1TB SSD / GTX1080Ti 11GB DDR5X / HOTAS COUGAR. TrackIR 4 / 3x24" Mon. (res:5760x1200) / Cougar MFD's / Wheel Pedals / Win 10 64 bit.
-
Wow an hippocampus!!! Not a Vigen???
Look behind the cockpit
http://www.airliners.net/photo/Sweden–-Air/Saab-JA37D-Viggen/0298757/L/(you should have known……
) -
;-):mrgreen:
-
I have a pic i want to use of my nickname but if i put it in TGA just get a bunch of pixels, what program do you use to do this?
-
It has to be a 16-bit uncompressed TGA image. I would use an image editor, such as GIMP, to convert the photo or patch to the appropriate format.
-
Not that this is that important, but I’m curious…. If you use magenta as the background, how does it come out as seen in the final version?
-
Not that this is that important, but I’m curious…. If you use magenta as the background, how does it come out as seen in the final version?
Pure magenta (R:255, G:0, B:255) will appear transparent in the F4 user interface.
-
Pure magenta (R:255, G:0, B:255) will appear transparent in the F4 user interface.
Thanks but……I did understand using magenta results with transparency, but does this apply as a general rule or just the F4 interface? It’s just odd because obviously the background is not magenta. I’m asking because I’ve spent time trying to resolve this issue with other applications and wonder if this (transparency) works globally. I’m not a photoshop wiz and wonder if this is all I needed to know all along when attempting to make other backgrounds transparent. I struggled with this and instead tried (unsuccessfully) to match background color as a fix.
-
Thanks but……I did understand using magenta results with transparency, but does this apply as a general rule or just the F4 interface? It’s just odd because obviously the background is not magenta. I’m asking because I’ve spent time trying to resolve this issue with other applications and wonder if this (transparency) works globally. I’m not a photoshop wiz and wonder if this is all I needed to know all along when attempting to make other backgrounds transparent. I struggled with this and instead tried (unsuccessfully) to match background color as a fix.
Magenta is for f4 only.
Transparency in photoshop can be achieved if you transform your background layer to layer 0, then simply select and delete what you want to appear as transparent. You will see white/grey blocks in the background which is to indicate transparency. Finally choose te correct fileformat which supports transparency. Save in .png for example…
My advise is, make google your friend
| AMD RYZEN9 5900X | ASUS RTX 4080 | G.SKILL 3200-C14 32GB | ASUS X570-E GAMING | LG 27GP850 2K/QHD |
| TM HOTAS COUGAR + MOD | VPC WARBRD BASE | MFG CROSSWIND V2 | G.TRIX JETSEAT KW908 | HP REVERB G2 |