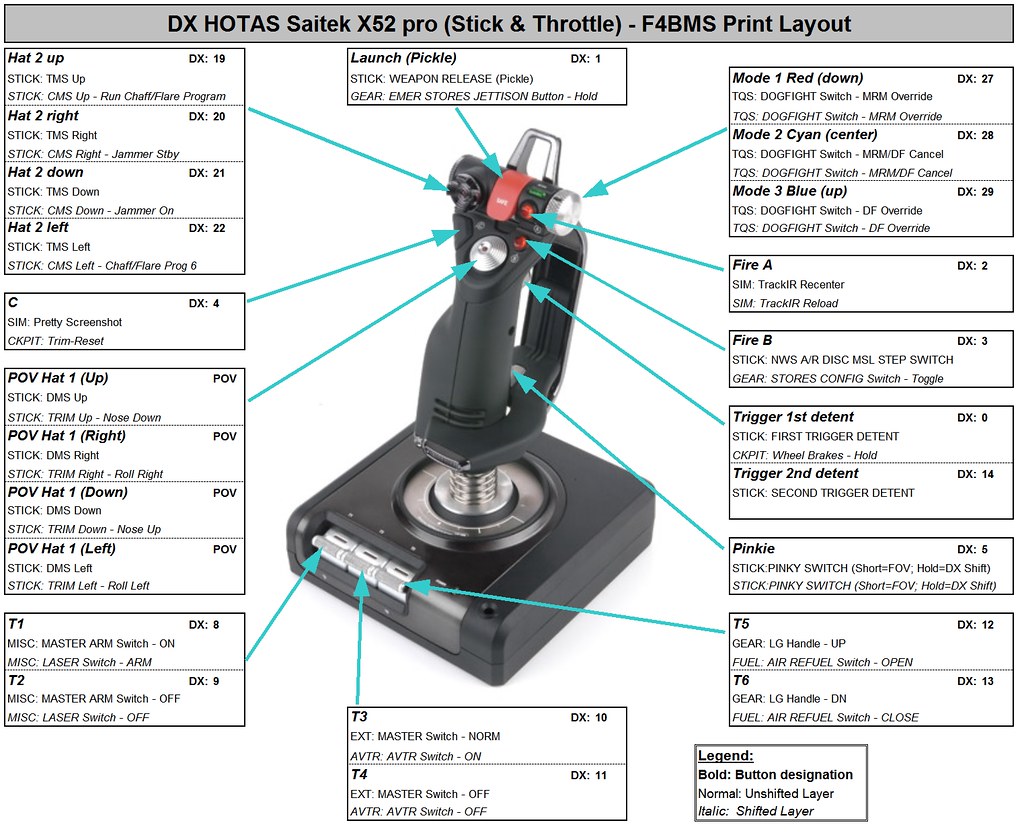
Flounder's X52 Pro Keyfile/DX Profile for BMS 4.33
-
There are 5 Master Modes …. Nav, AG, AA, Dogfight/SRM and MRM. They are selectable from the buttons on the ICP.
When you choose Dogfight or MRM you ‘over ride’ the previous selected mode. You have to ‘cancel’ the over ride to return to the basic Nav/AG/AA mode.
AA and MRM are very nearly identical from a user standpoint.
So, with the Mode switch the ‘top’ switch is set to Dogfight, the middle to Over Ride (i.e. user selected NAV or AG or AA) and the bottom to MRM (which is basically AA).
What this allows you to do is set the middle position to AG or NAV (depending on your mission and/task), then fly most of your mission in MRM override (bottom position). If/When you need AG mode, for example, simply flip to the middle (cancel) position, do your AG thing, then flip back to MRM.
Or, for example, you’re flying along in NAV and get jumped by MiG’s, switch up to Dogfight, kill the MiG’s and drop right back to NAV.
Frederf made me do it. Possibly the most useful ‘HOTAS Mode Management’ tip I’ve ever read:
…. Consider flying the entire ingress in MRM override with AG master underneath. Then drop out of MRM to do your AG work and switch back to MRM (or even dogfight) every time a weapon is released as you recover. …
…. So, NAV/AG in the middle position, MRM/AA in the lower position and DF override in the upper position. Fly typical ingress/egress in MRM; Flip to NAV/AG as needed. Brilliant! …
-
Thanks so much! I think I finally get it!
-
I’m having a strange issue i know this is an old thread but i also have the x52 pro and decided to get into falcon BMS
My problem is when i have the profile loaded in x52 pro software the little mouse moves the radar screen/TGP whatever else but nothing else works i can’t TMS UP and switch screens or SOI a screen IF I DISABLE the profile i can TMS up and change screens and lock them but then i don’t have the ability to move the tcg/crosshair things on the screens EDIT ITS NOT TMS UP IS THE BUTTON THAT YOU USE TO SWITCH SCREENS ETC I DON"T KNOW WHAT ITS CALLED LOL
Something werid happening iv’e done reinstall of drivers etc
Anyone have an updated Pro/key file on here for this joystick that works ? thanks
EDIT i turned off the software and just manually set up the radar buttons
what was on saitek software besides the modes you had set ? anything important ?
i just removed the VHF things on the little 4 way back black button on the throttle not to sure if there important i just taught they where voice chat for online or something
(new at BMS C:)
-
I’m having a strange issue i know this is an old thread but i also have the x52 pro and decided to get into falcon BMS
My problem is when i have the profile loaded in x52 pro software the little mouse moves the radar screen/TGP whatever else but nothing else works ….
That’s the way it’s supposed to be. That is the whole point. Get rid of the pain-in-the-neck, cross-talking, pseudo-button-pressing middle-ware and use DX as much as possible.
…. what was on saitek software besides the modes you had set ? anything important ? …
Nothing on Saitek SST program except radar cursor slew and TeamSpeak PTT. Modes are not in the Saitek progamming.
By you description it’s not clear to me what the problem is. It almost sounds as if you have not loaded they *.key file into BMS via the Setup UI.
You can check this. With everything hooked launch BMS and go to SETUP –>CONTROLLERS–>LOAD–>Select the proper keyfile, then choose LOAD, then APPLY, then OK. Please see the video in post #1.
Another possibility is device order if you have separate rudder pedals or separate MFD’s, etc. In that case find the file: x:\Falcon BMS 4.33 U1\User\Config\DeviceSorting.txt and make the “Saitek X52 Pro Flight Controller” the first item in the list. You can use Notepad or any plain text editor.
The 4-way on the back are ‘important’ IF you need multiplayer comms and data.
-
Loaded both profiles but none of the shifted buttons are working. Pinky switch works as shift in the X-52 program but not in BMS.
Any ideas? I disabled the “clutch” on the windows control panel. Doesn’t look like my modes are acting as buttons either.
-
Loaded both profiles but none of the shifted buttons are working. Pinky switch works as shift in the X-52 program but not in BMS.
Any ideas?
Not sure what the bold part means? The pinky switch should do nothing in the Saitek SST program if you’ve loaded the profile correctly. It will show as ‘working’ in the game control panel area, where buttons light red when you press them so you know they are working.
In the control panel, did you set ‘Clutch Mode’ off (unchecked)?
Are the non-shift buttons all working correctly?
-
Not sure what the bold part means? The pinky switch should do nothing in the Saitek SST program if you’ve loaded the profile correctly. It will show as ‘working’ in the game control panel area, where buttons light red when you press them so you know they are working.
In the control panel, did you set ‘Clutch Mode’ off (unchecked)?
Are the non-shift buttons all working correctly?
The non-shift do work correctly.
Clutch mode is unchecked.
Perhaps the profile did not load correctly, although I just copied and pasted it from your unzipped file. Should there be 6 modes (1-3 plus shifted modes)?
I recently just started using the X52 again. I downloaded the SST and it looks different from previous. Has a Logitech launcher, but when you open up the programmer it looks the same as before…
-
…. Should there be 6 modes (1-3 plus shifted modes)? …
No. There should be one mode, no shift. The SST file is almost entirely empty. All buttons/commands are direct to BMS except cursor slew and TS/External Push-to-Talk. Those are the only commands in SST.
-
I deleted the other modes and shift is working fine. Haven’t tried every button but not very much stick time during Christmas.
Thanks again,
Chuck
-
The radar cursor is the only thing not working. If someone will let me know what I need to edit in the SST to get that working, I would appreciate it!!
-
There is a Saitek *.pr0 file included in the download which has cursor mapping.
-
No sure why I can’t get that profile to work for me. Every time I load it it looks like the default profile.
Anyway, I was able to edit the “bands” in the mouse pointer and get that to work. Not sure I really like it that way- always hated those “eraser” mouse controls on older laptops. :mad:
-
First, let say a big thanks to Agave_Blue for sharing this excellent profile. It works great! I am recently coming back to F4BMS after a year long pause and found this profile to be very useful upon my return. Thanks Agave_Blue.
There is one change I would like to make however. The Fire C button (Pretty Screenshot) on the stick I currently don’t use and I would like to re-purpose it for LMFD OSB 3. This will allow me to cycle NORM to EXP when in AA Mode to expand the target tracks for easier acquisition. Is there a way of doing this? I looked at the .key and .pr0 files in a text editor but I did not find anything in both files that made much sense to me because of the hex code. Can someone point me to the line of code that needs to be changed in order to change Fire C to LMFD OSB 3. Any help with this would be greatly appreciated. Thanks.
I’m more than happy to help you remap a more useful command to replace ‘pretty screen shot’, but FOV norm/expand already exists. It is the pinky switch (DX Button #5). The way it works is …. on short press (about 1/4 second) it will act to change FOV on the current sensor of interest (SOI).
So on AA FCR, NORM/EXP; on AG NORM/EXP/DBS1/DBS2; on TGP WIDE/NARO; on WPN NORM/EXP.
When held the pinky then acts as a shift key for additional ‘shifted commands’.
So tap the pinky for SOI FOV change and hold the pinky for the shift layer function.
-
This is how you would change one command to another, using the request above as an example. First open the keyfile in notepad or any other plain text editor. It should be “x:\Falcon BMS 4.33 U1\User\Config\Flounder X52 Pro v5 - Full.key” unless the user renamed it.
Go toward the bottom of the keyfile and find the DX commands. This section:
#===================================================================================
#==================================================================================
SimDoNothing -1 0 0XFFFFFFFF 0 0 0 -2 "========= HOTAS UNSHIFTED ========="
SimTriggerFirstDetent 0 -1 -2 0 0x0 -1
SimPickle 1 -1 -2 0 0x0 -1
RecenterTrackIR 2 -1 -2 0 0x0 -1
SimMissileStep 3 -1 -2 0 0x0 -1
PrettyScreenShot 4 -1 -2 0 0x0 -1
SimHotasPinkyShift 5 -1 -2 0 0x0 -1
AFBrakesToggle 6 -1 -2 0 0x0 -1
SimToggleMissileCage 7 -1 -2 0 0x0 -1
SimArmMasterArm 8 -1 -2 0 0x0 311
SimSafeMasterArm 9 -1 -2 0 0x0 311
SimExtlMasterNorm 10 -1 -2 0 0x0 115
SimExtlMasterOff 11 -1 -2 0 0x0 115
AFGearUp 12 -1 -2 0 0x0 119
AFGearDown 13 -1 -2 0 0x0 118
SimTriggerSecondDetent 14 -1 -2 0 0x0 -1
SimCursorEnable 15 -1 -2 0 0x0 -1
SimRadarRangeStepDown 16 -1 -2 0 0x0 -1
SimRadarRangeStepUp 17 -1 -2 0 0x0 -1
SimRFNorm 18 -1 -2 0 0x0 310
SimTMSUp 19 -1 -2 0 0x0 -1
SimTMSRight 20 -1 -2 0 0x0 -1
SimTMSDown 21 -1 -2 0 0x0 -1
SimTMSLeft 22 -1 -2 0 0x0 -1
SimTransmitCom1 23 -1 -2 0 0x0 -1
SimCommsSwitchRight 24 -1 -2 0 0x0 -1
SimTransmitCom2 25 -1 -2 0 0x0 -1
SimCommsSwitchLeft 26 -1 -2 0 0x0 -1
SimSelectMRMOverride 27 -1 -2 0 0x0 -1
SimDeselectOverride 28 -1 -2 0 0x0 -1
SimSelectSRMOverride 29 -1 -2 0 0x0 -1
SimDoNothing 30 -1 -2 0 0x0 -1
AWACSDeclare 31 -1 -2 0 0x0 -1
SimDMSUp 0 -1 -3 0 0x0 -1
SimDoNothing 0 -1 -3 1 0x0 -1
SimDMSRight 0 -1 -3 2 0x0 -1
SimDoNothing 0 -1 -3 3 0x0 -1
SimDMSDown 0 -1 -3 4 0x0 -1
SimDoNothing 0 -1 -3 5 0x0 -1
SimDMSLeft 0 -1 -3 6 0x0 -1
SimDoNothing 0 -1 -3 7 0x0 -1
#==================================================================================
SimDoNothing -1 0 0XFFFFFFFF 0 0 0 -2 "========= HOTAS SHIFTED ========="
SimWheelBrakes 256 -1 -2 0 0x0 -1
SimEmergencyJettison 257 -1 -2 0 0x0 123
ReloadTrackIR 258 -1 -2 0 0x0 -1
SimCATSwitch 259 -1 -2 0 0x0 115
AFResetTrim 260 -1 -2 0 0x0 -1
SimHotasPinkyShift 261 -1 -2 0 0x0 -1
SimCBEOSB_6L 262 -1 -2 0 0x0 126
SimCBEOSB_8L 263 -1 -2 0 0x0 126
SimLaserArmOn 264 -1 -2 0 0x0 310
SimLaserArmOff 265 -1 -2 0 0x0 310
SimAVTRSwitchOn 266 -1 -2 0 0x0 115
SimAVTRSwitchOff 267 -1 -2 0 0x0 115
SimFuelDoorOpen 268 -1 -2 0 0x0 311
SimFuelDoorClose 269 -1 -2 0 0x0 311
SimDoNothing 270 -1 -2 0 0x0 -1
SimRadarCursorZero 271 -1 -2 0 0x0 -1
SimHSDRangeStepDown 272 -1 -2 0 0x0 -1
SimHSDRangeStepUp 273 -1 -2 0 0x0 -1
SimRFQuiet 274 -1 -2 0 0x0 310
SimCMSUp 275 -1 -2 0 0x0 -1
SimCMSRight 276 -1 -2 0 0x0 -1
SimCMSDown 277 -1 -2 0 0x0 -1
SimCMSLeft 278 -1 -2 0 0x0 -1
SimRadarBarScanChange 279 -1 -2 0 0x0 -1
SimRadarAzimuthScanChange 280 -1 -2 0 0x0 -1
SimRadarBarScanChange 281 -1 -2 0 0x0 -1
SimRadarAzimuthScanChange 282 -1 -2 0 0x0 -1
SimSelectMRMOverride 283 -1 -2 0 0x0 -1
SimDeselectOverride 284 -1 -2 0 0x0 -1
SimSelectSRMOverride 285 -1 -2 0 0x0 -1
SimDoNothing 286 -1 -2 0 0x0 -1
AWACSVectorToThreat 287 -1 -2 0 0x0 -1
AFElevatorTrimUp 2 -1 -3 0 0x0 -1
SimDoNothing 2 -1 -3 1 0x0 -1
AFAileronTrimRight 2 -1 -3 2 0x0 -1
SimDoNothing 2 -1 -3 3 0x0 -1
AFElevatorTrimDown 2 -1 -3 4 0x0 -1
SimDoNothing 2 -1 -3 5 0x0 -1
AFAileronTrimLeft 2 -1 -3 6 0x0 -1
SimDoNothing 2 -1 -3 7 0x0 -1
In that section of the keyfile, you want to change this line:
PrettyScreenShot 4 -1 -2 0 0x0 -1
What you want to do is change the command (“PrettyScreenShot”). In this example to this command (also found in the keyfile), “SimCBEOSB_3L”
Just cut/paste so that “PrettyScreenShot 4 -1 -2 0 0x0 -1” becomes “SimCBEOSB_3L 4 -1 -2 0 0x0 -1”
Then re-save the key file.
-
This post is deleted! -
I’m more that happy to help you remap a more useful command to replace ‘pretty screen shot’, but FOV norm/expand already exists. It is the pinky switch (DX Button #5). The way it works is …. on short press (about 1/4 second) it will act to change FOV on the current sensor of interest (SOI).
So on AA FCR, NORM/EXP; on AG NORM/EXP/DBS1/DBS2; on TGP WIDE/NARO; on WPN NORM/EXP.
When held the pinky then acts as a shift key for additional ‘shifted commands’.
So tap the pinky for SOI FOV change and hold the pinky for the shift layer function.
Thanks for the quick reply. That’s great. I didn’t know that function was already there. I will check it out later tonight.
-
This is how you would change one command to another, using the request above as an example. First open the keyfile in notepad or any other plain text editor. It should be “x:\Falcon BMS 4.33 U1\User\Config\Flounder X52 Pro v5 - Full.key” unless the user renamed it.
Go toward the bottom of the keyfile and find the DX commands. This section:
#===================================================================================
#==================================================================================
SimDoNothing -1 0 0XFFFFFFFF 0 0 0 -2 "========= HOTAS UNSHIFTED ========="
SimTriggerFirstDetent 0 -1 -2 0 0x0 -1
SimPickle 1 -1 -2 0 0x0 -1
RecenterTrackIR 2 -1 -2 0 0x0 -1
SimMissileStep 3 -1 -2 0 0x0 -1
PrettyScreenShot 4 -1 -2 0 0x0 -1
SimHotasPinkyShift 5 -1 -2 0 0x0 -1
AFBrakesToggle 6 -1 -2 0 0x0 -1
SimToggleMissileCage 7 -1 -2 0 0x0 -1
SimArmMasterArm 8 -1 -2 0 0x0 311
SimSafeMasterArm 9 -1 -2 0 0x0 311
SimExtlMasterNorm 10 -1 -2 0 0x0 115
SimExtlMasterOff 11 -1 -2 0 0x0 115
AFGearUp 12 -1 -2 0 0x0 119
AFGearDown 13 -1 -2 0 0x0 118
SimTriggerSecondDetent 14 -1 -2 0 0x0 -1
SimCursorEnable 15 -1 -2 0 0x0 -1
SimRadarRangeStepDown 16 -1 -2 0 0x0 -1
SimRadarRangeStepUp 17 -1 -2 0 0x0 -1
SimRFNorm 18 -1 -2 0 0x0 310
SimTMSUp 19 -1 -2 0 0x0 -1
SimTMSRight 20 -1 -2 0 0x0 -1
SimTMSDown 21 -1 -2 0 0x0 -1
SimTMSLeft 22 -1 -2 0 0x0 -1
SimTransmitCom1 23 -1 -2 0 0x0 -1
SimCommsSwitchRight 24 -1 -2 0 0x0 -1
SimTransmitCom2 25 -1 -2 0 0x0 -1
SimCommsSwitchLeft 26 -1 -2 0 0x0 -1
SimSelectMRMOverride 27 -1 -2 0 0x0 -1
SimDeselectOverride 28 -1 -2 0 0x0 -1
SimSelectSRMOverride 29 -1 -2 0 0x0 -1
SimDoNothing 30 -1 -2 0 0x0 -1
AWACSDeclare 31 -1 -2 0 0x0 -1
SimDMSUp 0 -1 -3 0 0x0 -1
SimDoNothing 0 -1 -3 1 0x0 -1
SimDMSRight 0 -1 -3 2 0x0 -1
SimDoNothing 0 -1 -3 3 0x0 -1
SimDMSDown 0 -1 -3 4 0x0 -1
SimDoNothing 0 -1 -3 5 0x0 -1
SimDMSLeft 0 -1 -3 6 0x0 -1
SimDoNothing 0 -1 -3 7 0x0 -1
#==================================================================================
SimDoNothing -1 0 0XFFFFFFFF 0 0 0 -2 "========= HOTAS SHIFTED ========="
SimWheelBrakes 256 -1 -2 0 0x0 -1
SimEmergencyJettison 257 -1 -2 0 0x0 123
ReloadTrackIR 258 -1 -2 0 0x0 -1
SimCATSwitch 259 -1 -2 0 0x0 115
AFResetTrim 260 -1 -2 0 0x0 -1
SimHotasPinkyShift 261 -1 -2 0 0x0 -1
SimCBEOSB_6L 262 -1 -2 0 0x0 126
SimCBEOSB_8L 263 -1 -2 0 0x0 126
SimLaserArmOn 264 -1 -2 0 0x0 310
SimLaserArmOff 265 -1 -2 0 0x0 310
SimAVTRSwitchOn 266 -1 -2 0 0x0 115
SimAVTRSwitchOff 267 -1 -2 0 0x0 115
SimFuelDoorOpen 268 -1 -2 0 0x0 311
SimFuelDoorClose 269 -1 -2 0 0x0 311
SimDoNothing 270 -1 -2 0 0x0 -1
SimRadarCursorZero 271 -1 -2 0 0x0 -1
SimHSDRangeStepDown 272 -1 -2 0 0x0 -1
SimHSDRangeStepUp 273 -1 -2 0 0x0 -1
SimRFQuiet 274 -1 -2 0 0x0 310
SimCMSUp 275 -1 -2 0 0x0 -1
SimCMSRight 276 -1 -2 0 0x0 -1
SimCMSDown 277 -1 -2 0 0x0 -1
SimCMSLeft 278 -1 -2 0 0x0 -1
SimRadarBarScanChange 279 -1 -2 0 0x0 -1
SimRadarAzimuthScanChange 280 -1 -2 0 0x0 -1
SimRadarBarScanChange 281 -1 -2 0 0x0 -1
SimRadarAzimuthScanChange 282 -1 -2 0 0x0 -1
SimSelectMRMOverride 283 -1 -2 0 0x0 -1
SimDeselectOverride 284 -1 -2 0 0x0 -1
SimSelectSRMOverride 285 -1 -2 0 0x0 -1
SimDoNothing 286 -1 -2 0 0x0 -1
AWACSVectorToThreat 287 -1 -2 0 0x0 -1
AFElevatorTrimUp 2 -1 -3 0 0x0 -1
SimDoNothing 2 -1 -3 1 0x0 -1
AFAileronTrimRight 2 -1 -3 2 0x0 -1
SimDoNothing 2 -1 -3 3 0x0 -1
AFElevatorTrimDown 2 -1 -3 4 0x0 -1
SimDoNothing 2 -1 -3 5 0x0 -1
AFAileronTrimLeft 2 -1 -3 6 0x0 -1
SimDoNothing 2 -1 -3 7 0x0 -1
In that section of the keyfile, you want to change this line:
PrettyScreenShot 4 -1 -2 0 0x0 -1
What you want to do is change the command (“PrettyScreenShot”). In this example to this command (also found in the keyfile), “SimCBEOSB_3L”
Just cut/paste so that “PrettyScreenShot 4 -1 -2 0 0x0 -1” becomes “SimCBEOSB_3L 4 -1 -2 0 0x0 -1”
Then re-save the key file.
That’s Awesome!!! Is there a doc that explains what the codes represent for the varies HOTAS buttons and keyboard keys? In other words, how would I have known that “….4 -1 -2 0 0x0 -1” is for the Fire C button? Regardless, thanks again for the quick and informative response.
-
That’s Awesome!!! Is there a doc that explains what the codes represent for the varies HOTAS buttons and keyboard keys? In other words, how would I have known that “….4 -1 -2 0 0x0 -1” is for the Fire C button? Regardless, thanks again for the quick and informative response.
There is a document that explains the parts of the command lines. x:\Falcon BMS 4.33 U1\Docs\Key Files & Input\BMS Key File Manual.pdf . The description for DX begins in section 6.2.
That has to be matched to a ‘map’ of the HOTAS …. which button on a HOTAS is which DX number (see post #1 in this tread, for example).
-
…. how would I have known that “… 4 -1 -2 0 0x0 -1” is for the Fire C button? ……
The part that matters for knowing it is the Fire C button is the button number, bolded above. In the keyfile they run from DX 0 - 31, so there’s an ‘offset’ of one … Button 1 is DX 0, button 2 is DX 1, etc. So we’re looking for DX 4, which is button 5. Match that to the button map for the HOTAS: