CCIP Cockpit Mod
-
@RPG:
Hey Chuck nice update!,…… in that link Rthorflech posted the panel around the altimeter/speed indicator has a silver appearance, is black normal or is the silver/chrome look just a custom job?.
Which picture are you talking about?
Please link it. -
This post is deleted! -
@RPG:
This one……see the chrome panel?
Thnaks, RPG.
I’m sorry, I don’t know why it is painted silver or no painted.
All of birds I have seen are painted black except the hill bird. -
This post is deleted! -
Update.
The new version 4.5.0 include some fixes.
The following is changelog.- Added reflection effect of EHSI window film.
- Fixed RWR Azimuth Indicator.
- Fixed the backlight of RPM Indicator.
- Changed the color of air conditioner duct.
http://farm3.staticflickr.com/2821/9574771057_90accf810f_b.jpg
http://farm3.staticflickr.com/2831/9574770597_30e7e32739_b.jpg
Download link has been available at first post of this thread.
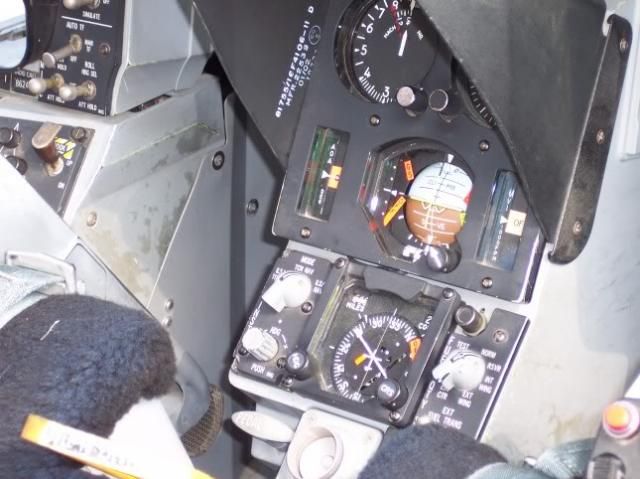
Here is a picture of the CPD taken from one of the F-16’s in my unit. The TCN/ILS rotary and the HDG rotary are just plain EL panels just as with the fuel panel switch on the right side. You could technically put it back if you wanted to. Just my thought. This picture was taken at last years air show.
Nice work!
Jack
-
@RPG:
This one……see the chrome panel?
But it is an F-16CG, different layout from CJs anyway…:idea: E.g. the ICP/panel section.
-
RPG, since you evidently have both this mod and PLHarpoon’s pilot mod working together, can you please post step-by-step instructions on how to do so?
-
This post is deleted! -
I asked PL_Harpoon via PM before I did it for our stuff and he said it was ok. But I know Chuck needs to give the ok too.
-
-
Ok……you asked for it so here it is:
Install Chuck’s fantastic CCIP Cockpit mod first then:
Open Lod editor 6.23, then open ‘pilot.lod’ in PL_Harpoons pilot mod folder by selecting ‘File’ then ‘Open Model File’ and navigate to the ‘pilot.lod’, edit the lod, when on the edit screen open the 0.root node, click on ‘1.XDOF’, then in the tools drop down folder select ‘block select’ and press ‘go’, all 3 node folders should now be highlighted in blue, (i.e. 1.XDOF, 2.XDOF, 3. Subtree), now from the tools drop down folder select ‘block export’ and export the ‘blk’ file to your desktop, you can give the ‘blk’ file any name you like…thats that bit done so you can can close Lod editor now. (do not press the ‘Br Mode’ button at all during this whole proccess).
Now…open Lod editor again, type ‘2’ next to ‘Normal’ button and click ‘Normal’, under ‘LOD indexes’ you should see ‘7318’ click on the ‘1’ next to it, then click on ‘Edit LOD’ to take you to edit screen, first thing to do is click on ‘ACTION’ then ‘Set HDR Max nodes’ then click ‘yes’, now double click on ‘0.Root’, in the Node-Root window click on the ‘+’ next to ‘nxPtr’, from the drop down folder select ‘Split’ then select ‘chP’ for branch and click the ‘ADD’ button, then click ‘Rebuild’ Node Tree.
Next, open ‘0.Root’ and click on the new ‘Split’ folder thats been created, then select ‘block import’ from the tools drop down folder and import the ‘blk’ file from your desktop, make sure the ‘Split’ folder is still selected and select ‘block paste’ from the tools drop down folder, when asked ‘Remove the Subtree or DOF?’ click ‘NO’, the pilot lod should now be merged with 2.LOD, click ‘SAVE’ and your done.
Step 2:
Applying Correct Pilot Mod textures:
Open Lod Editor 6.23, type ‘2’ next to ‘Normal’ button then click ‘Normal’ button, under ‘LOD indexes’ you should see ‘7318’ click on the ‘1’ next to it, then click on ‘Edit LOD’ to take you to edit screen, double click on ‘0.Root’ to get the ‘Node-Root’ window up, then click on ‘Textures’ button, type in ‘8018’ in the box above ‘Add Texture’ then click ‘Add Texture’ button, do the same for ‘8019’ then click ‘Accept’ and ‘Accept’ again which will close ‘Node-Root’ window, next press the ‘isolate’ button then open ‘0.Root’ folder, then the ‘Split’ folder and click on the first folder inside the split folder, select ‘block select’ from the tools drop down folder then press ‘go’, all the folders in,the split folder should now be highlighted blue and you should only be able to see the pilot mod wire frames in the editor.
From the Tools drop down folder select ‘batch node processor’, the ‘Batch Node Change’ window will open, in the bottom left corner where it says ‘change texture’ click the bottom drop down box and change ‘-1’ to ‘(6)8018’ then click ‘change’ then ‘ok’ then click ‘save’ to save the lod, click the viewer button to check texture is ok (knee boards not done yet).
Next open ‘0.Root’ then the ‘Split’, then ‘5600.XDOF’ and scroll down to node ‘14739.CP-d149’ and click on it and select ‘block select’ from tools drop down box, all nodes from ‘14739.CP-d149’ down to ‘16002.CP-d149’ should now be selected and highlighted blue, if the ‘isolate’ button is still pressed then you should only see one of the knee board wire frames in edit screen!, select ‘batch node processor’ from the tools drop down box and change texture like you did earlier from ‘-1’ to ‘(7)8019’ then click ‘change’ then ‘ok’ then click ‘save’ to save lod, click the viewer button to check texture is ok, one knee board should be textured correctly.
Next, open ‘0.root’ then ‘Split’, then ‘5601.XDOF’ and scroll down to node ‘11443.CP-d149’ and click on it and select ‘block select’ from tools drop down box, all nodes from ‘11443.CP-d149’ down to ‘12706.CP-d149’ should now be selected and highlighted blue, if the ‘isolate’ button is still pressed then you should only see one of the knee board wire frames in edit screen!, select ‘batch node processor’ from the tools drop down box and change texture like you did earlier from ‘-1’ to ‘(7)8019’ then click ‘change’ then ‘ok’ then click ‘save’ to save lod, click the viewer button to check texture is ok, both knee boards and pilot should be textured correctly…your done!.
If you try hard you can do it!.:D…the node numbers may be different if your install is not the same as mine but this should give you general idea of how it is done.;)
Also make sure you have 8018.dds and 8019.dds textures pasted to KoreaObj folder before starting the merge.
And of course a big thanks goes out to PeCa_Chuck and PL_Harpoon for these two great mods.
-
Hi RPG,
Thanks a lot for this detailled step by step procedure.
Even if I am not used to LODEditor, and even if no Screen to hepl, your text is quite clear.Every thing works fine till step 2 : It seems I can’t add 8018 and 8019 textures as explained
@RPG:then click on ‘Textures’ button, type in ‘8018’ in the box above ‘Add Texture’ then click ‘Add Texture’ button, do the same for ‘8019’ then click ‘Accept’ and ‘Accept’ again which will close ‘Node-Root’ window,
texture (6) doesn’t exist when continuing the process……
Any idea?
in any cases, big thanks too to PeCa_Chuck and PL_Harpoon for these two great mods.
Windblow
-
This post is deleted! -
This post is deleted! -
I really appreciate the great job you’ve done, but I’m afraid there is something wrong with the ECDI


just as shown in pictures,the position of the CDI is wrong. It should parallel to the course arrow
-
I really appreciate the great job you’ve done, but I’m afraid there is something wrong with the ECDI
http://i.imgur.com/EqhS1Tt.jpg
http://i.imgur.com/sytq5mx.jpgjust as shown in pictures,the position of the CDI is wrong. It should parallel to the course arrow
Same issue here, i figured it out while doing some IFR approaches, but it is a bit disturbing to have the bar centered in diagonal, a quick fix maybe ?
-
Thank you for your bug report, frank and spooky.
I’m sorry about the issue.I’m fixing the bug, so please wait a moment until it finished.
Best regards.
PeCa_Chuck -
Update.
The new version 4.6.0 include some fixes.
The following is changelog.- Added paint peeling to some panels.
- Fixed Fuel Flow Indicator.
- Fixed Course Deviation Indicator.
Download link has been available at first post of this thread.
-
To update, do we just repeat the entire install process?
-
To update, do we just repeat the entire install process?
Yes, should be for avoiding further issues.